

Want to know what is Automatic1111 (also known as Stable Diffusion WebUI), and how to use it?
AUTOMATIC1111 is the go-to tool for tech-savvy people who love Stable Diffusion.
But let’s be honest, it’s not the easiest thing to use. There’s not much help to guide you other than GitHub, which is even complex.
But here’s a good news! In this step-by-step guide, we have explained everything about Stable Diffusion WebUI.
Let’s begin!
What is Stable Diffusion WebUI (AUTOMATIC1111)
If you’re keen on Stable Diffusion and want more power in your hands, then AUTOMATIC1111 is for you.
But, heads-up, it’s not for beginners!
Launched on May 14, 2023, AUTOMATIC1111 allows you to play with Stable Diffusion right from your web browser.
No messy setups! Sounds cool, right?
It’s packed with features, which can be a lot to take in so let’s break it down.
Why AUTOMATIC1111 Is Popular
Here are some reasons why Automatic1111 is so popular these days and why most people want to use it:
- Turn Text Into Images and Vice Versa: Just type some words and watch them turn into pictures. Or do it the other way around!
- One-Click Setup: Got Python and Git? Then, you’re one click away from using this tool.
- Add Details to Images: Called ‘inpainting‘ and ‘outpainting,’ this feature lets you add more stuff inside or around your image.
- Find the Best Keywords: There’s a ‘Prompt Matrix‘ to help you know which words make the biggest splash in your image.
- Make It Big: With the ‘Upscale’ feature, you can make your images larger and clearer.
- Pay Attention to Certain Words: Just put double parentheses around words like ((this)), and AUTOMATIC1111 will make sure those parts really stand out.
- Try, Try Again: With ‘Loopback,’ you can run the same image again and again to get it just right.
- Change Image Shape: Even after making an image, you can change its shape with a new aspect ratio.
- No More Funny Faces: The ‘Restore Faces‘ feature makes sure faces look real, not silly or weird.
- Make Patterned Pictures: Want a tiled look? You can do that too!
Let’s now understand how to install and start using the Stable Diffusion WebUI (AUTOMATIC1111).
Installing Stable Diffusion WebUI on Windows and Mac
In order to use AUTOMATIC1111 (Stable Diffusion WebUI) you need to install the WebUI on your Windows or Mac device.
To do that, follow the below steps to download and install AUTOMATIC1111 on your PC and start using Stable Diffusion WebUI:
Installing AUTOMATIC1111 on Windows
System Requirements:
- Windows 10 or higher
- Nvidia video card (GPU) with 4 GB VRAM or more
Step 1: Set Up Python
First, make sure your PC has Windows 10 or higher and a Nvidia video card with 4GB VRAM at least. Then, you’ll need Python 3.10.6.
You can get Python in two ways:
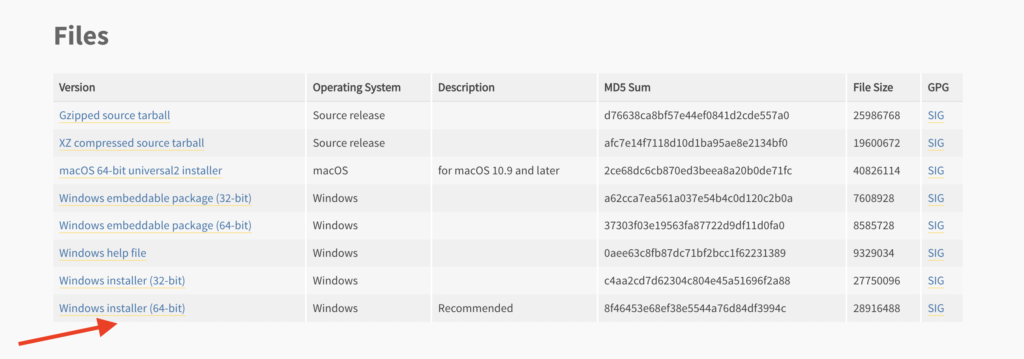
- Option 1: Download Python from the Microsoft Store.
- Option 2: Get the 64-bit installer from the Python website. If you 64-bit, check the box that says “Add Python to 3.10 to PATH.”
Go to Control Panel, find “Add or Remove Programs,” and uninstall any old Python versions before installing the new one.
After installing, open Command Prompt by pressing the Windows key and typing “cmd“. Type “python” and hit Enter.
You should see Python 3.10 show up. If it doesn’t, try restarting your PC or reinstalling Python.
Step 2: Install Git
Next, you’ll need Git.
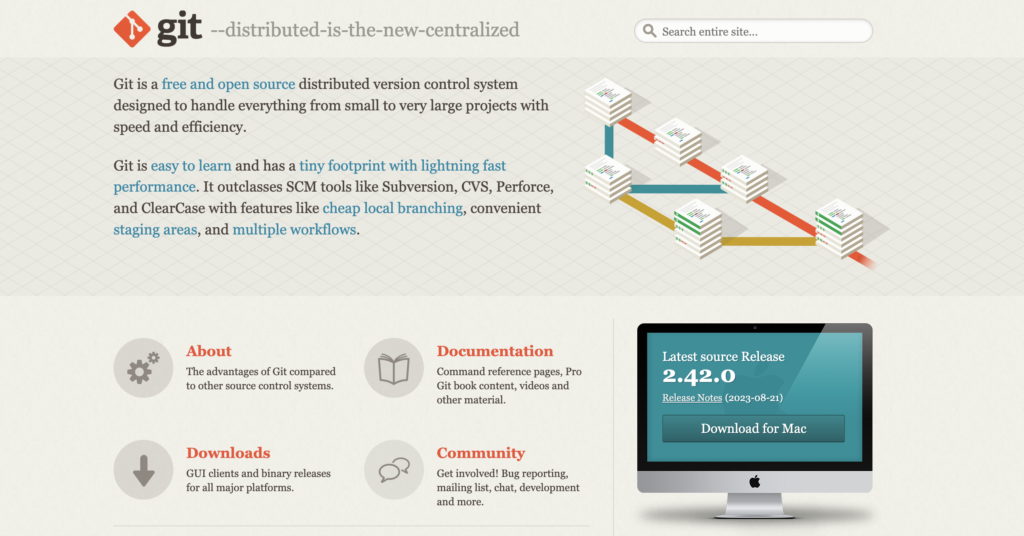
Go to the Git website to download it. Open the downloaded file and click Install.
Follow the on-screen steps carefully.
Step 3: Download AUTOMATIC1111
Press the Windows key and type “cmd” to open Command Prompt.
Note
Before doing anything else, make sure you are in your home folder by running the following command and hitting Enter. To check: Command Prompt should allow right-click paste.
Type cd %userprofile% and hit Enter.
Then, type git clone https://github.com/AUTOMATIC1111/stable-diffusion-webui.git and hit Enter.
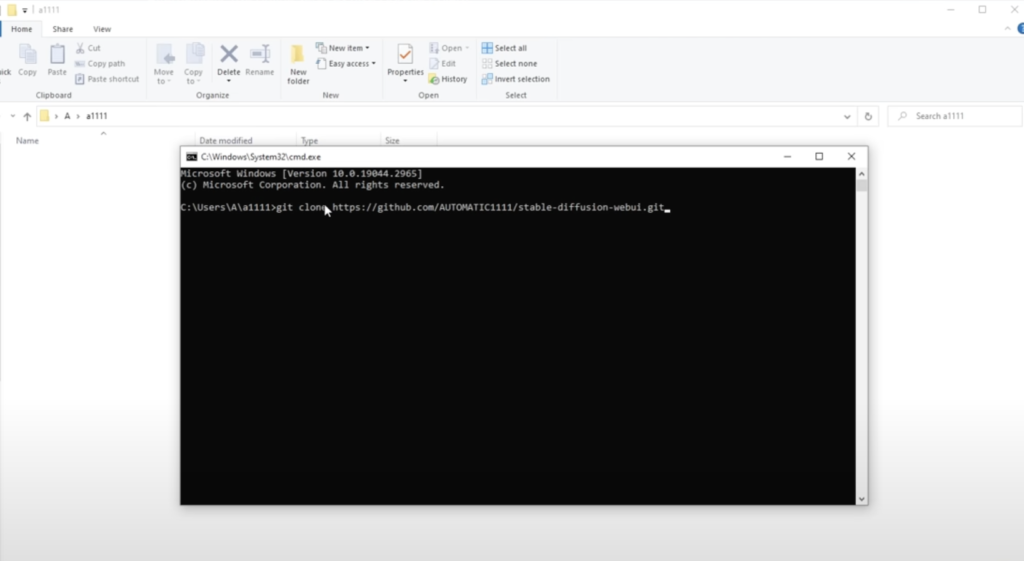
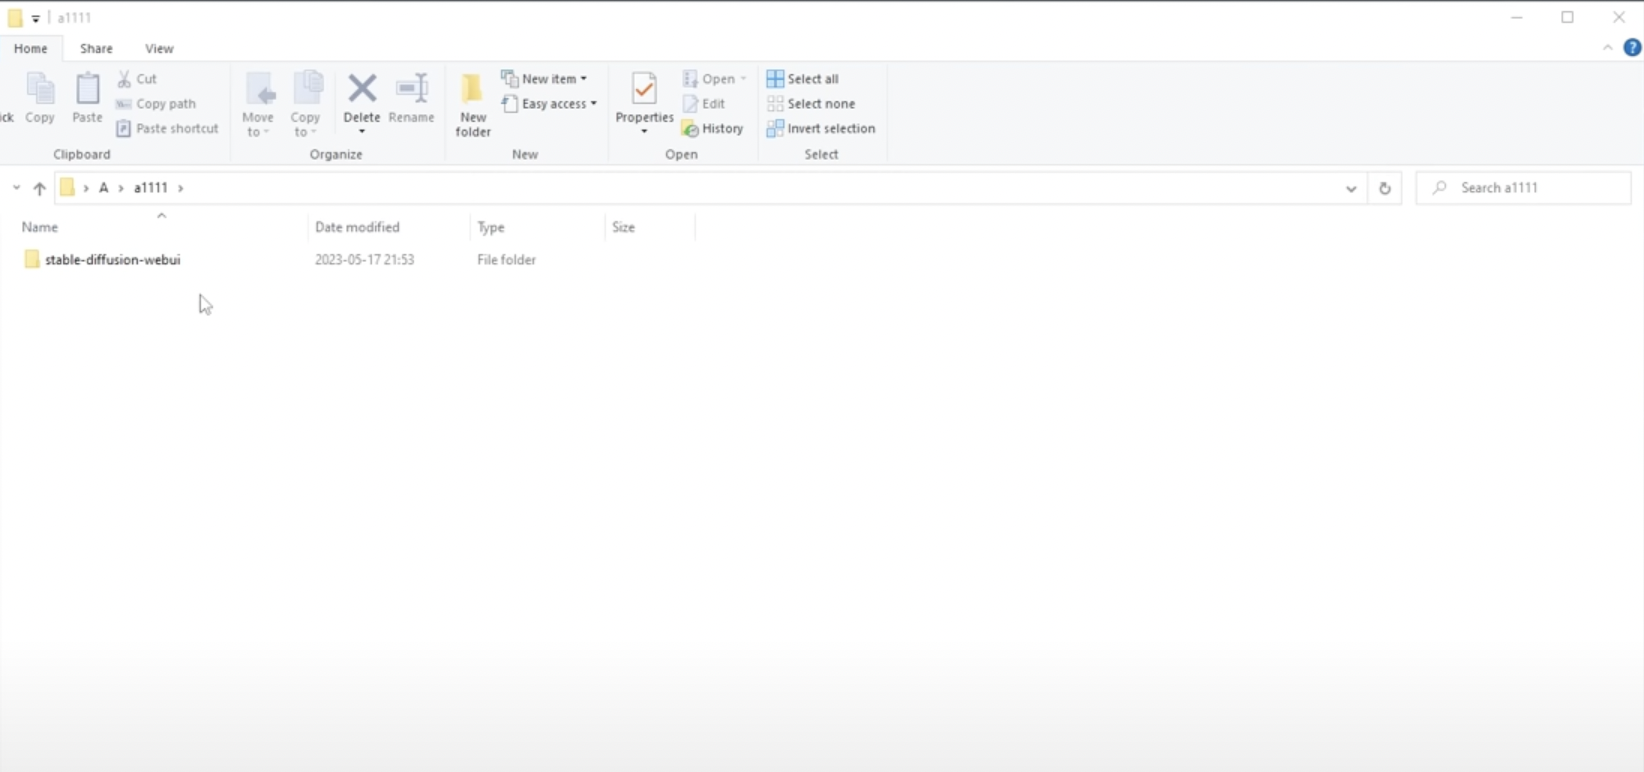
A new folder named “stable-diffusion-webui” will show up in your home folder.
Step 4: Add Model File
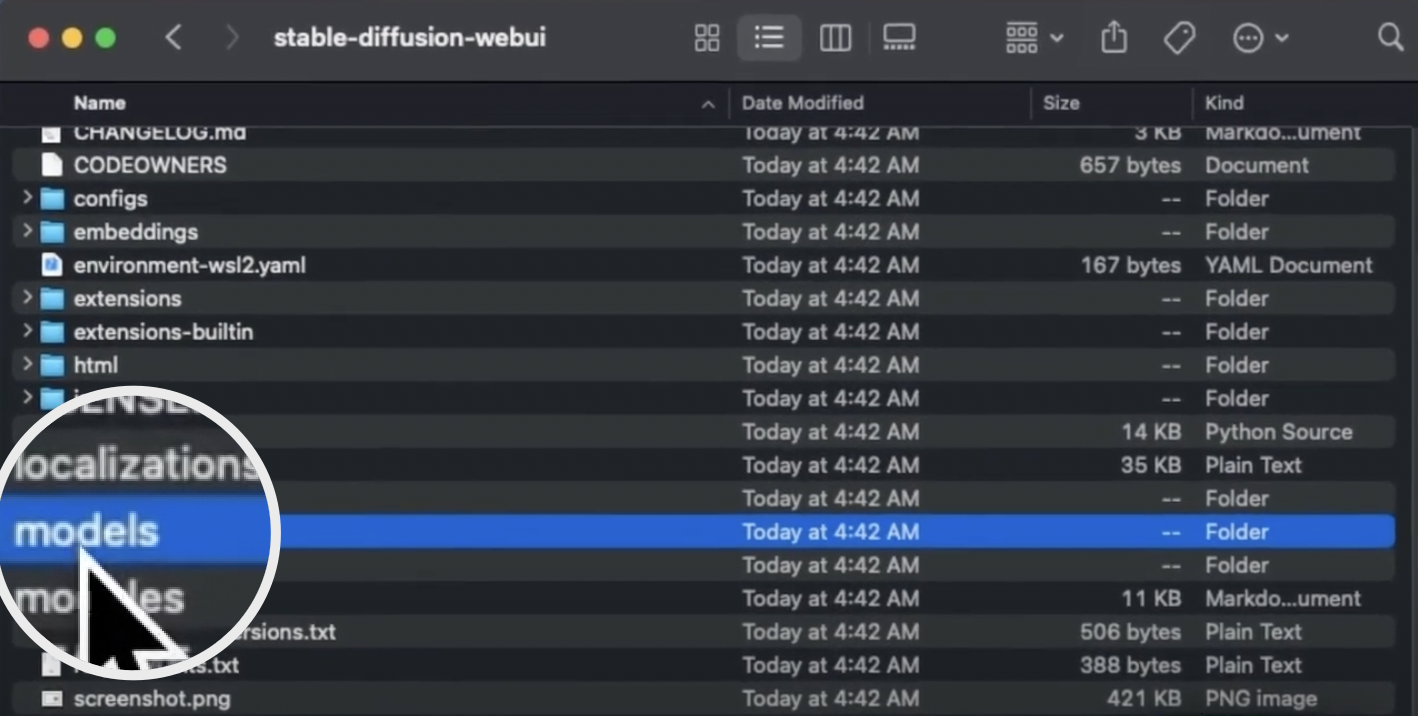
In File Explorer, go to %userprofile%\stable-diffusion-webui.
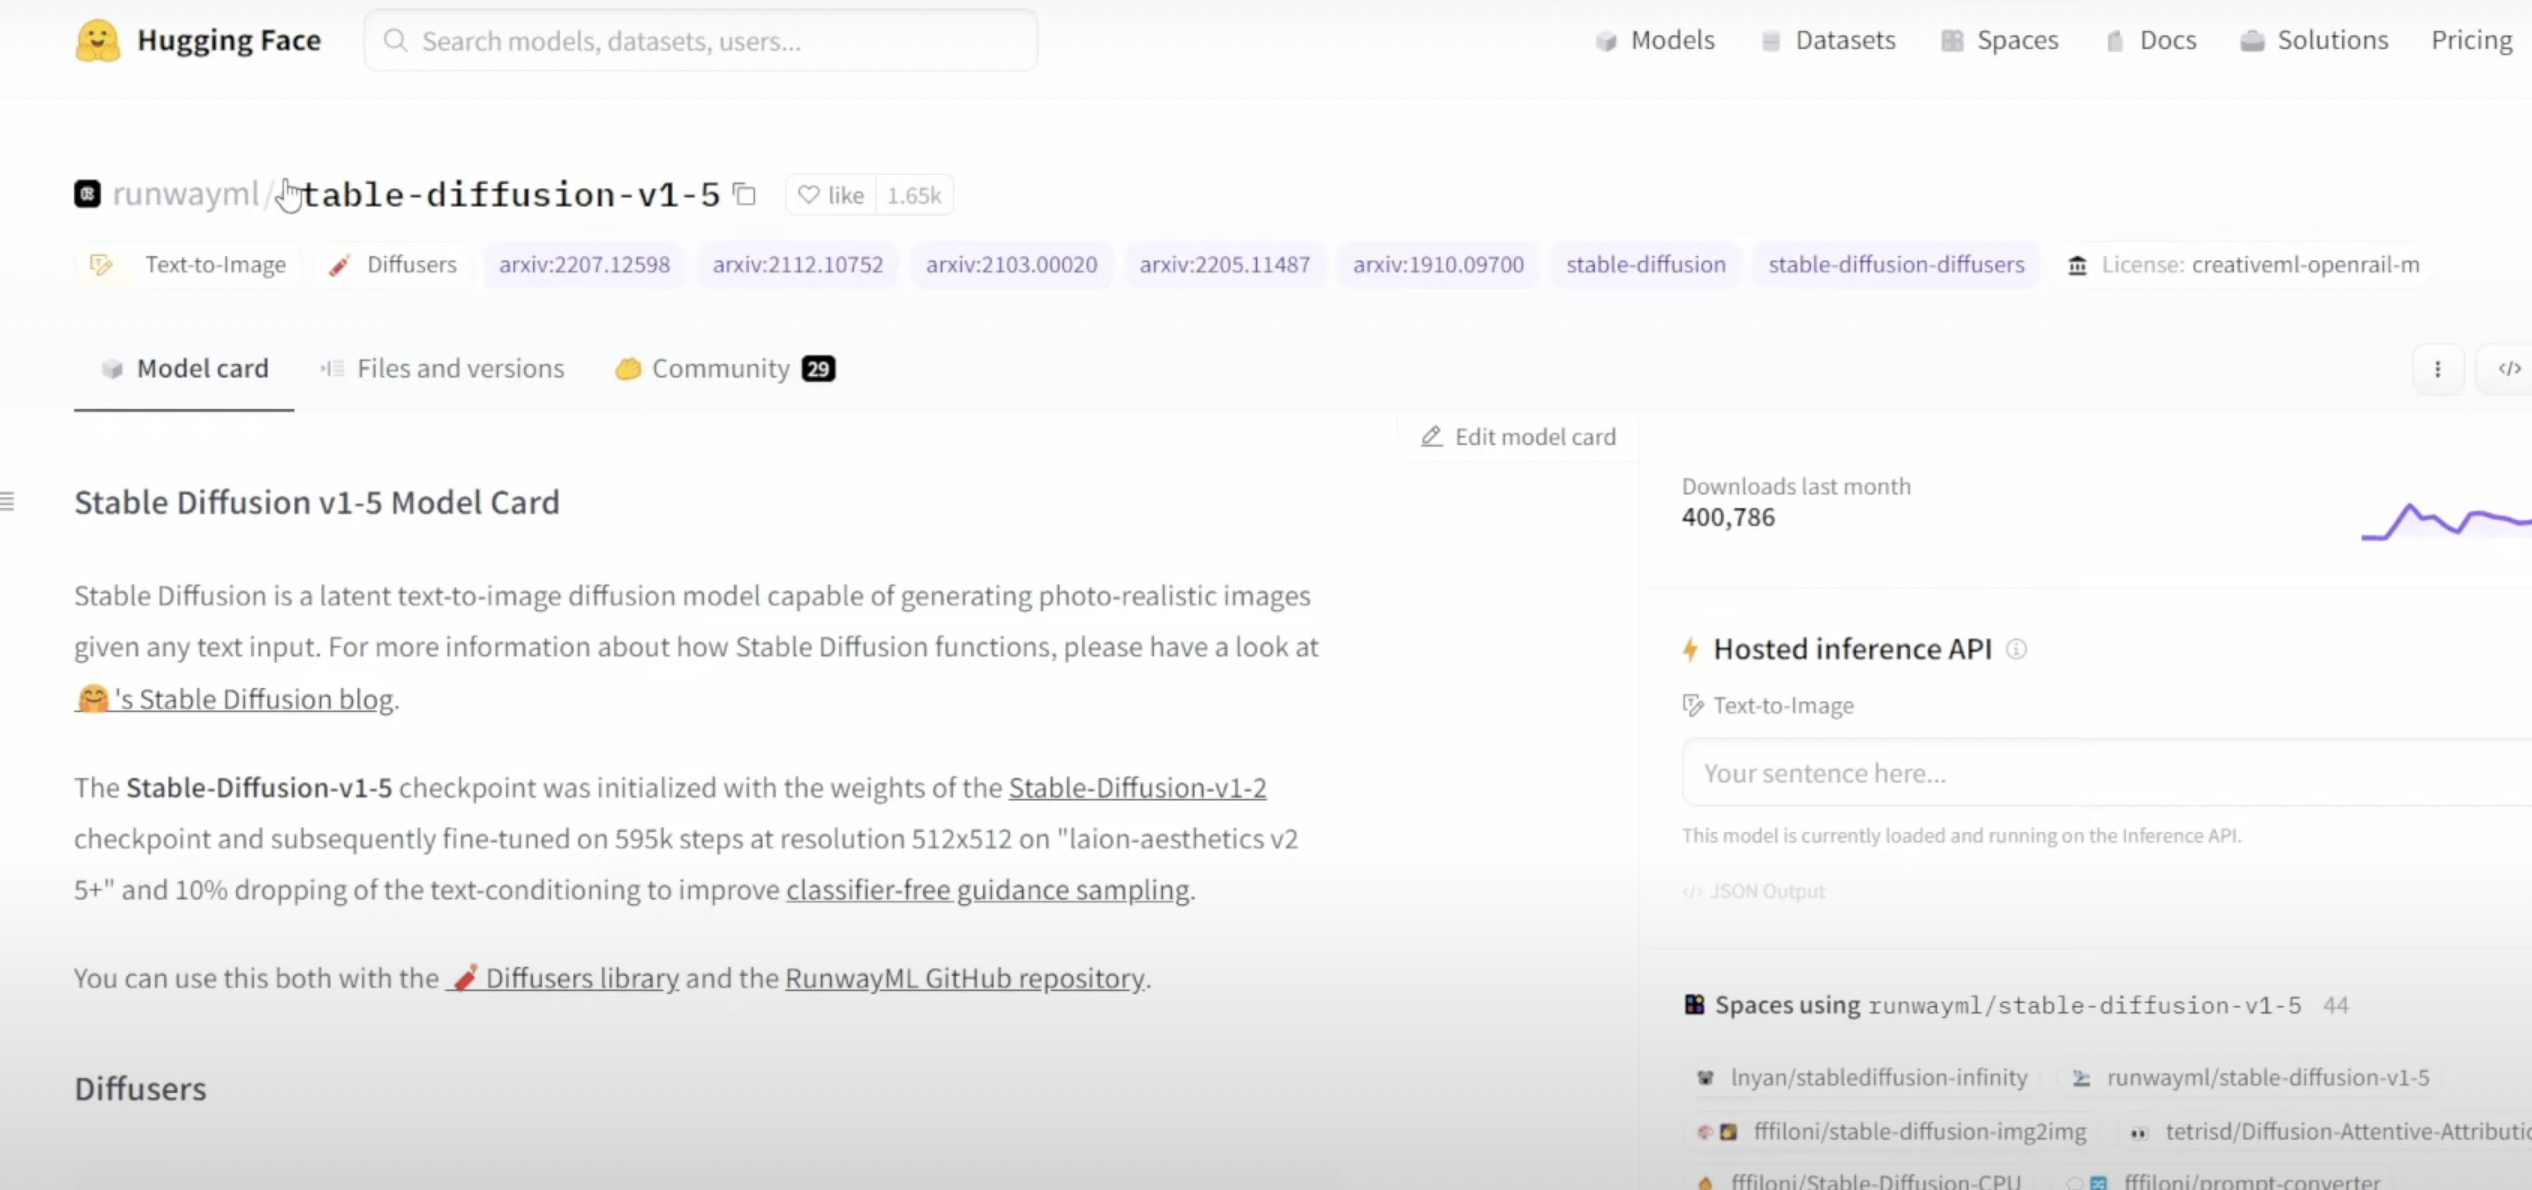
Look for a folder called “models” and inside that another called “Stable-diffusion.”

Download the Stable Diffusion v1.5 model (you can download it from here) and put it in Stable-diffusion folder.
Step 5: Run AUTOMATIC1111
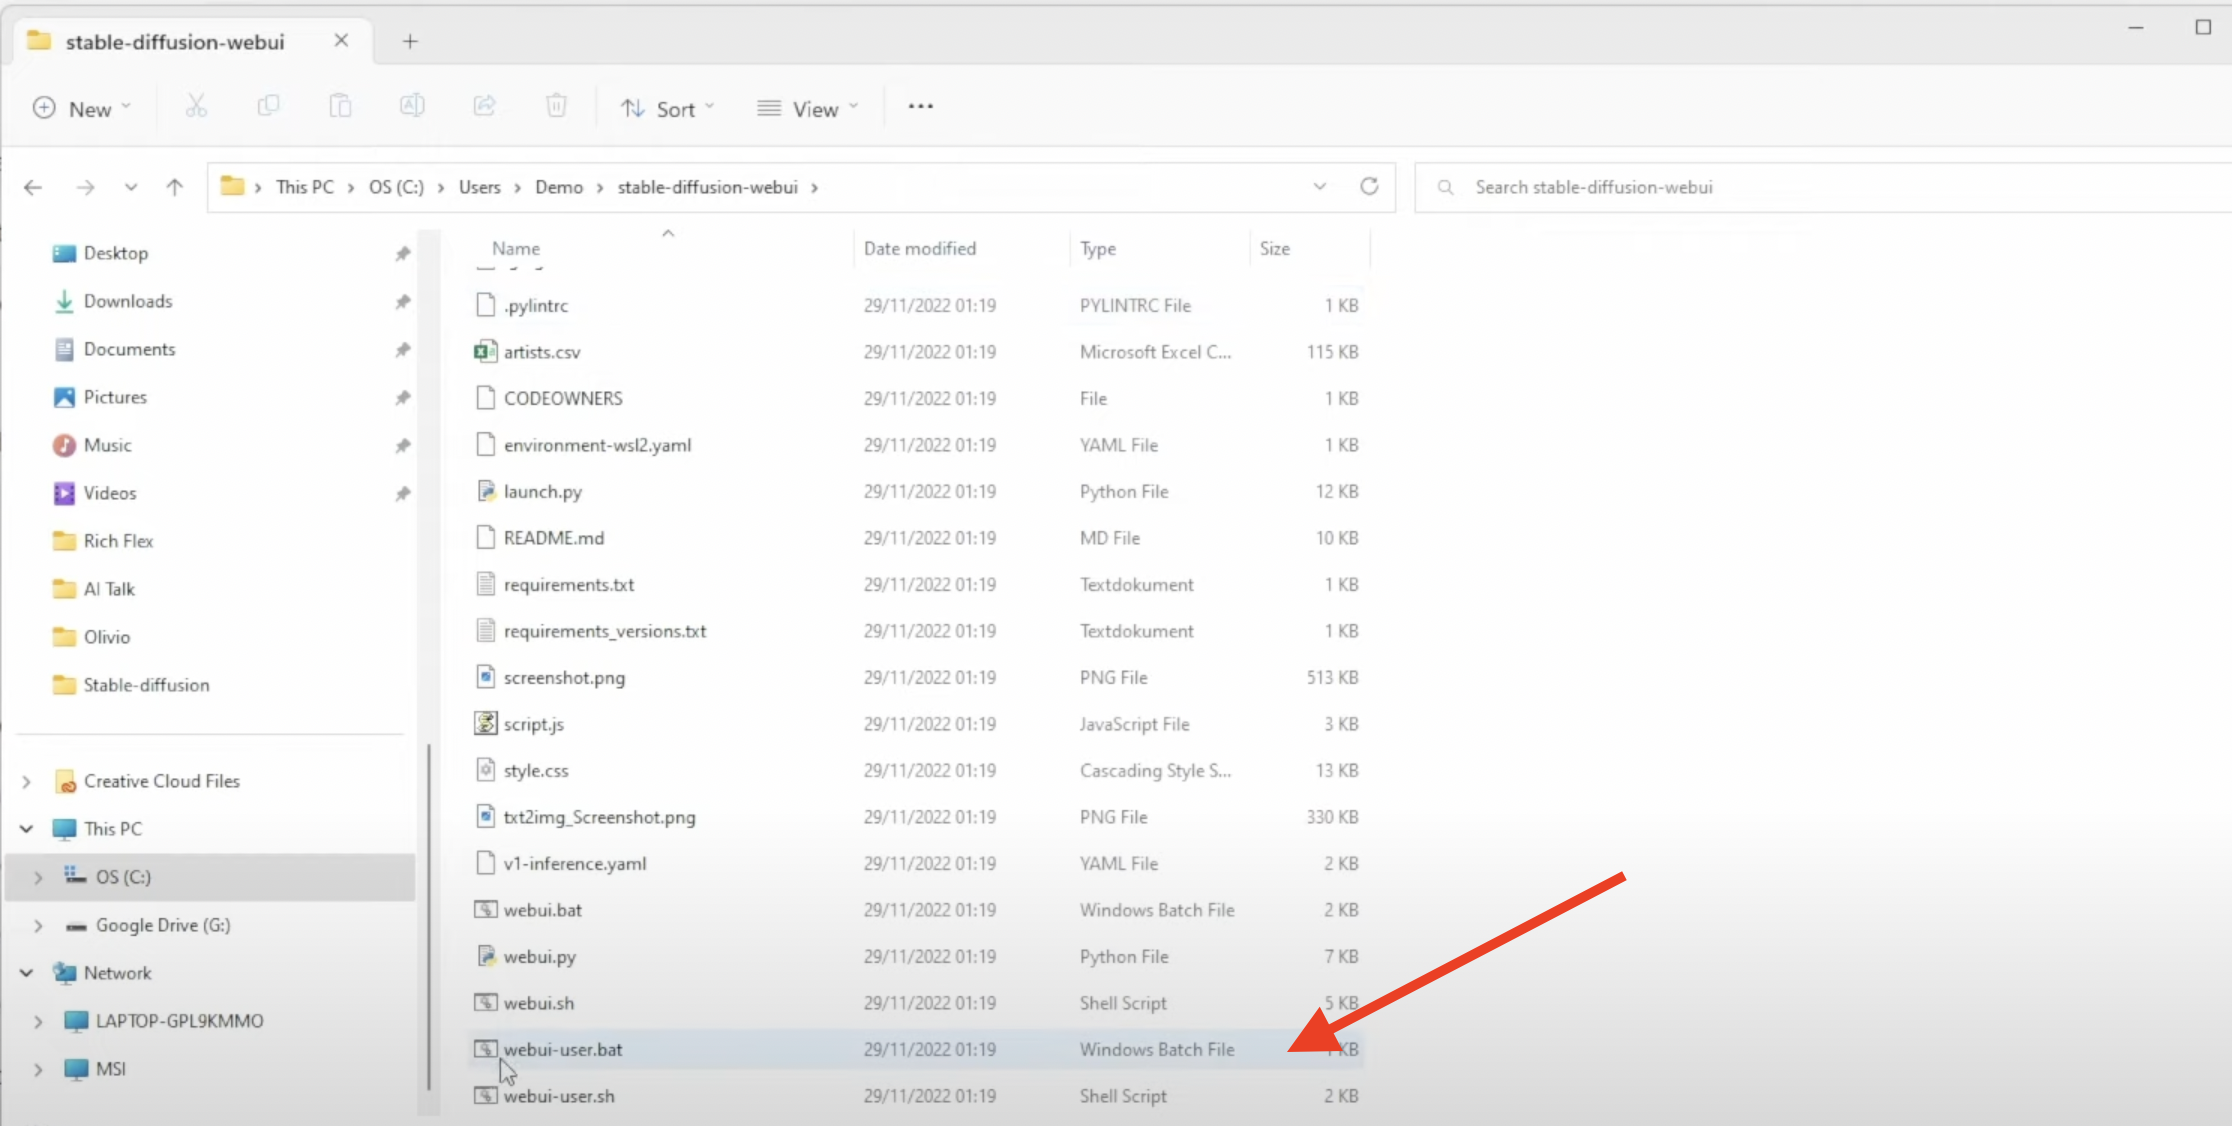
Finally, in File Explorer, go back to %userprofile%\stable-diffusion-webui.
Find a file called “webui-user.bat” and double-click it.
When you see the message “Running on local URL: http://127.0.0.1:7860,” open your web browser and go to that URL.
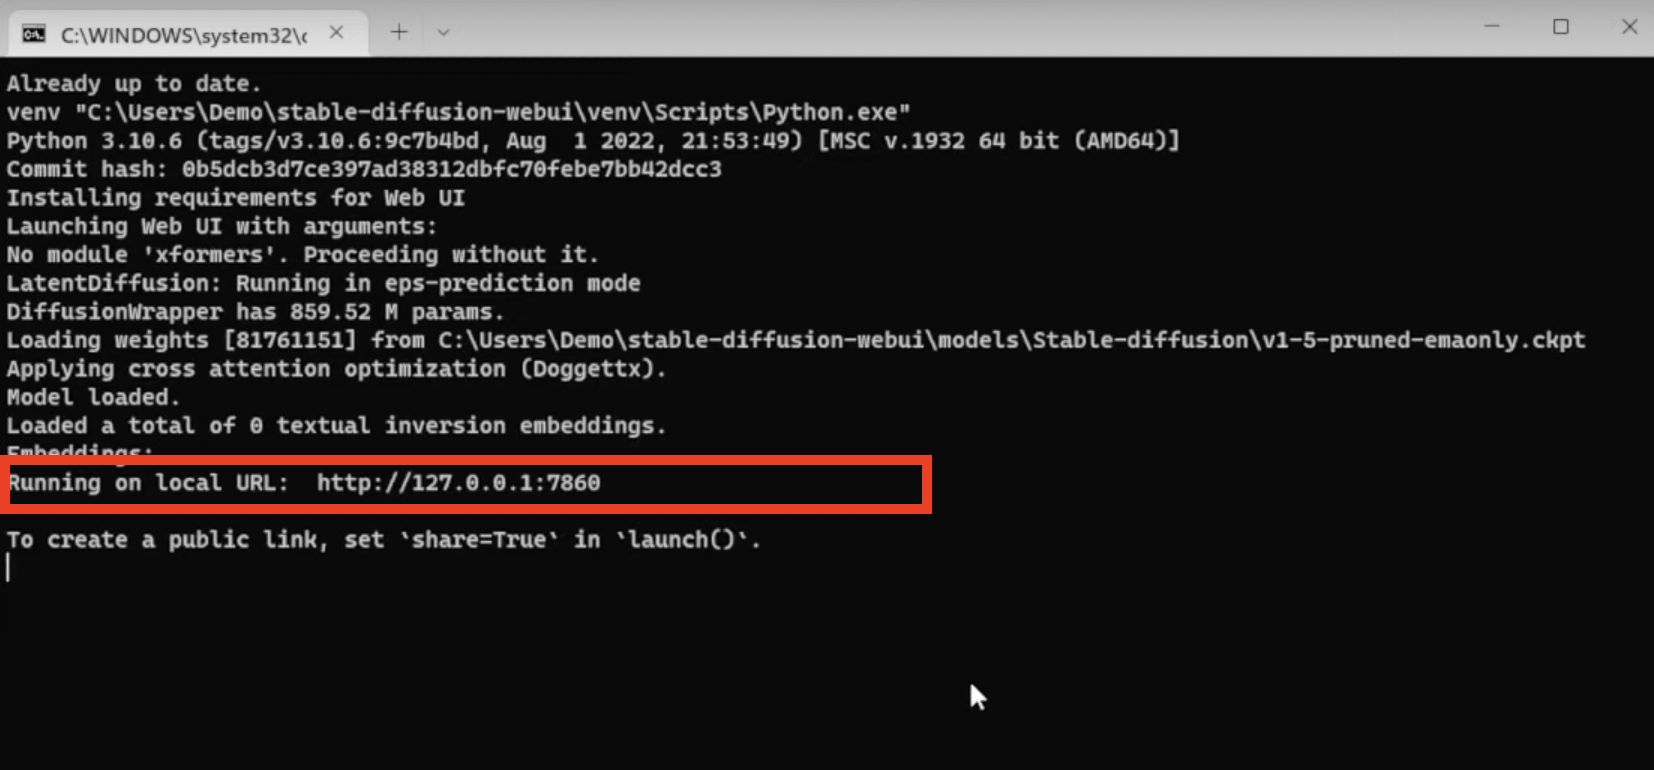
You’re done!
Close the cmd black window to exit Stable Diffusion when you’re done using it.
Remember
Stable Diffusion can be re-started by double-clicking the webui-user.bat file. Also, for a more in-depth guide on downloading Stable Diffusion on Windows, check out this guide.
Installing AUTOMATIC1111 on Apple Mac
System Requirements:
- Mac Apple Silicon M1/M2
- 16 GB of memory
Step 1: Install Homebrew
Install Homebrew (not for those who already have it in their system)First, open the Terminal app and type /bin/bash -c "$(curl -fsSL https://raw.githubusercontent.com/Homebrew/install/HEAD/install.sh)".
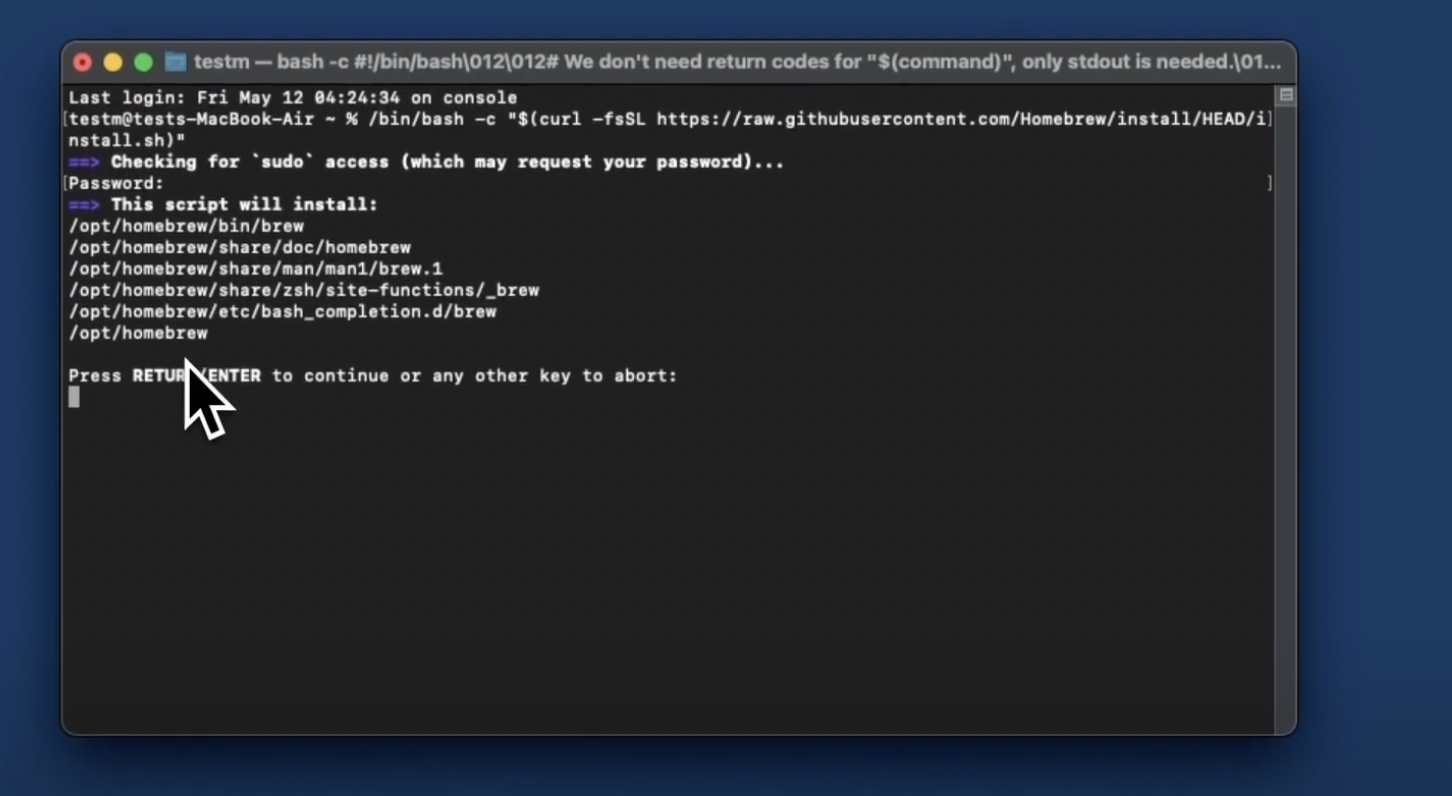
Press Enter to install Homebrew.
Step 2: Install Packages
Type brew install cmake protobuf rust [email protected] git wget in a new Terminal window and hit Enter.

Step 3: Download AUTOMATIC1111
Type git clone https://github.com/AUTOMATIC1111/stable-diffusion-webui in the Terminal to clone the AUTOMATIC1111 repository.
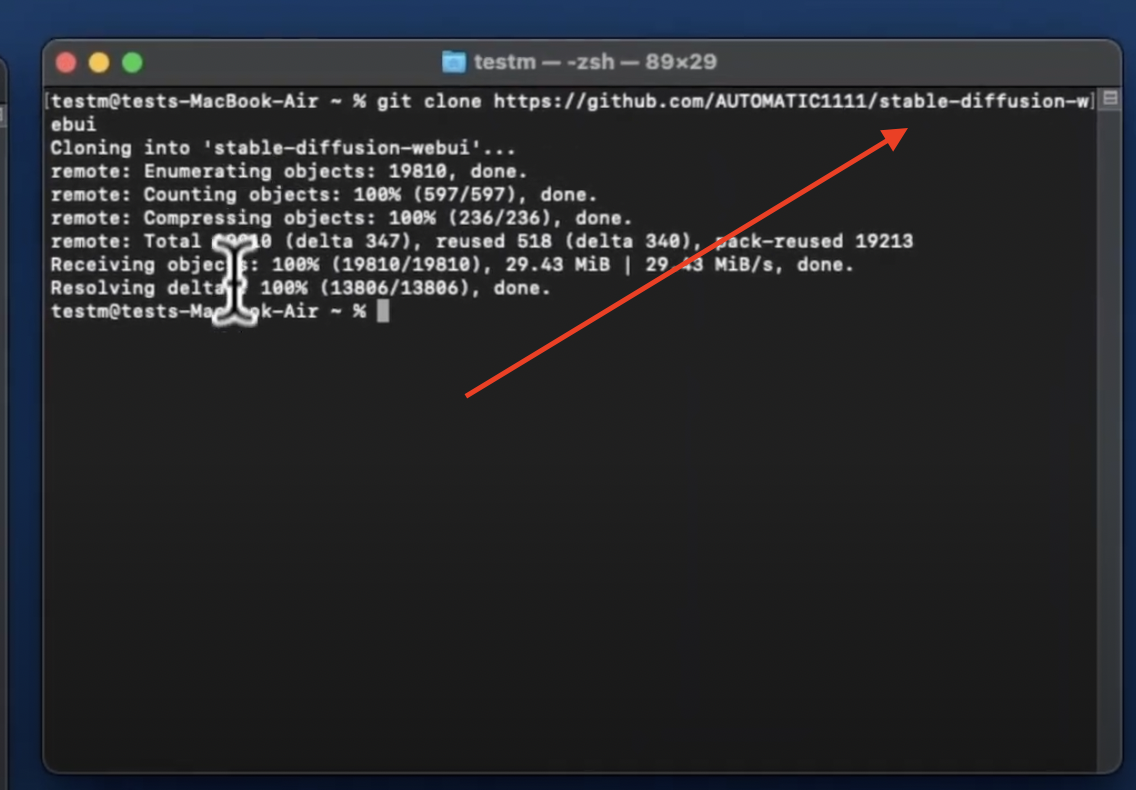
A new folder called “stable-diffusion-webui” will be created in your home folder.
Step 4: Get the Model File
Open Finder and go to your home folder.
Find “stable-diffusion-webui,” then “models,” then “Stable-diffusion.”
Download the Stable Diffusion v1.5 model and put it in this folder.
Step 5: Run AUTOMATIC1111
Open Terminal and type cd ~/stable-diffusion-webui;./webui.sh --no-half.
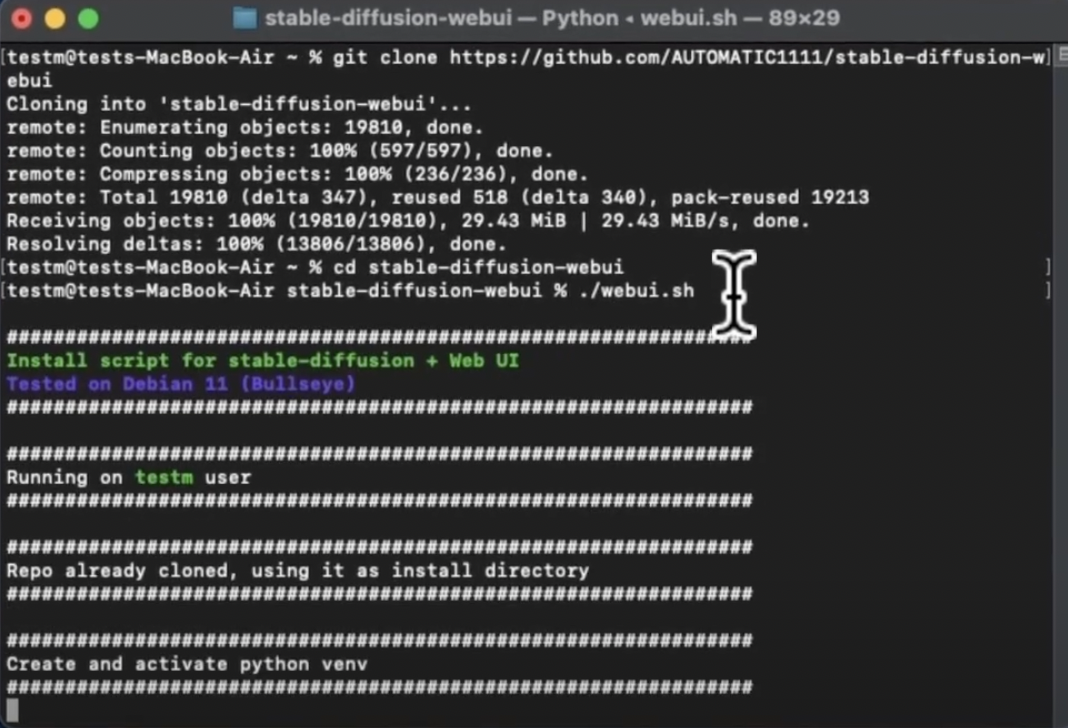
It may take some time.

When done, open your web browser and go to “http://127.0.0.1:7860”.
You’re all set!
Note
Alternatively, you can use Stable Diffusion on Chrome without downloading anything. Just visit Stablediffusion.fr to use stable diffusion for free. You can try almost every feature if you don’t have a reliable system right now.
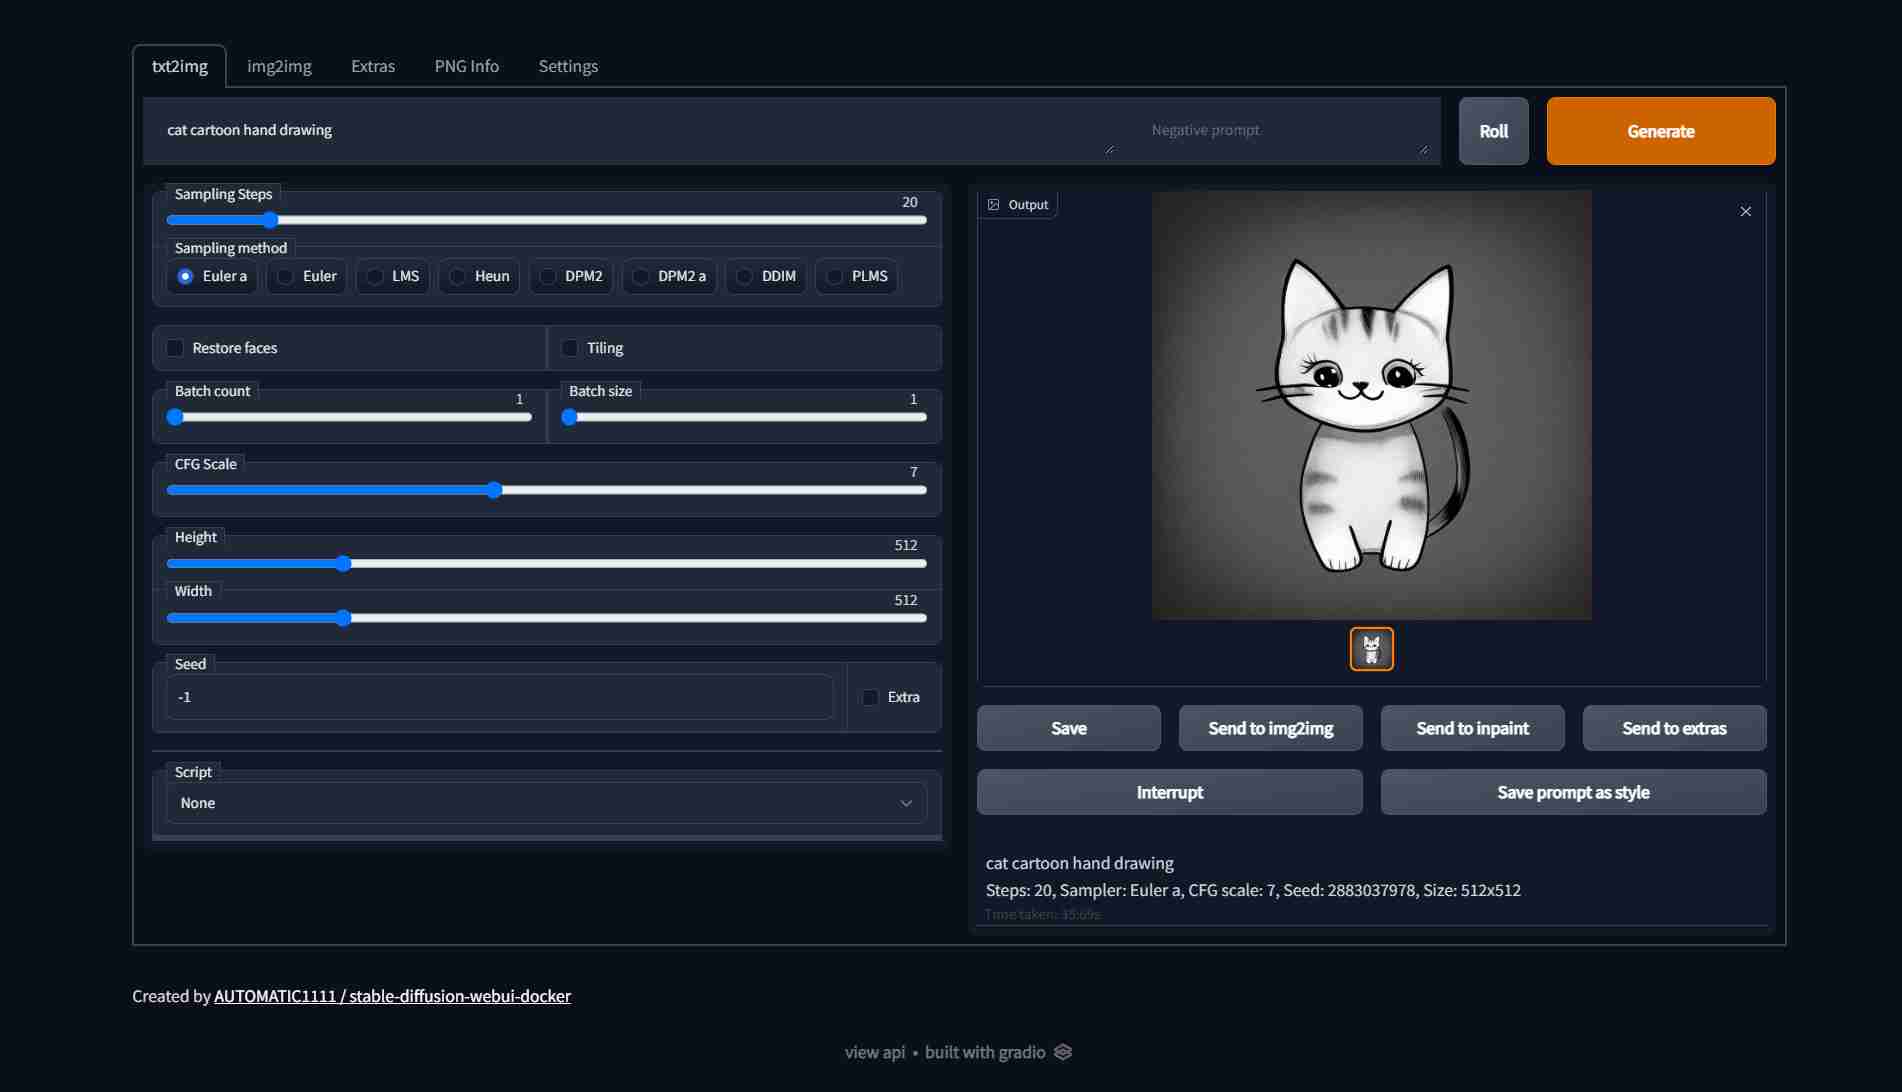
Getting Started with the txt2img Tab
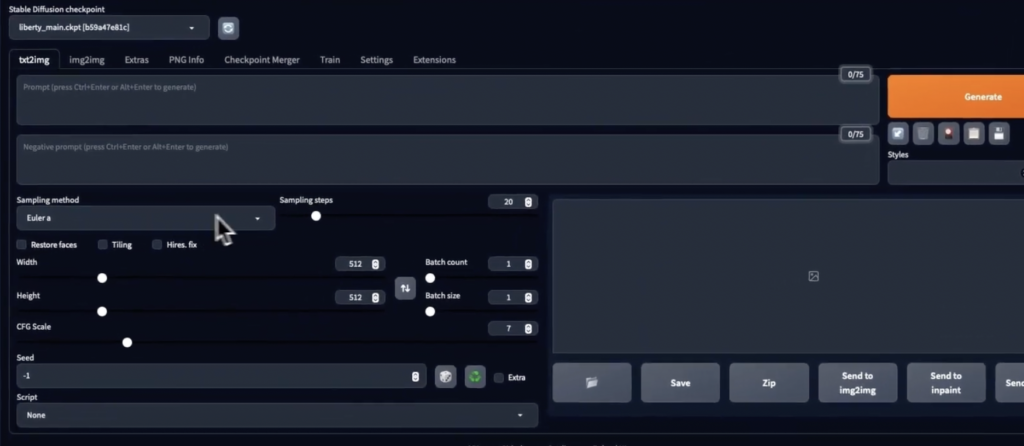
When you first open AUTOMATIC1111, you’ll notice a tab called txt2img. This is the heart of the software, where you can turn your text ideas into amazing images.
Here’s a guide to help you understand each setting and make the most out of it.
Setting Up Your Model
First thing you’ll see is the Stable Diffusion Checkpoint dropdown menu.
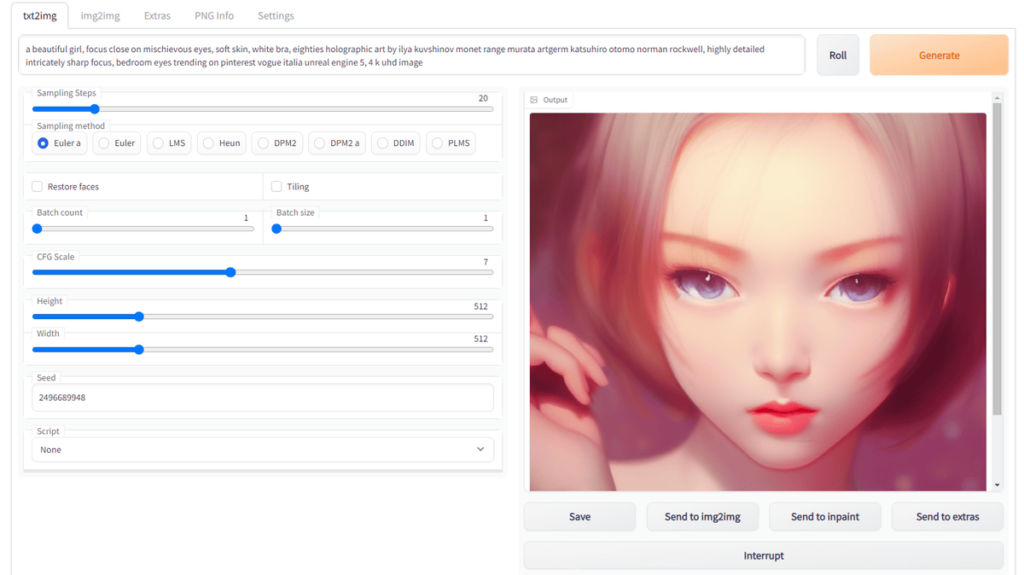
This is where you pick the model that will turn your text into an image.
If you’re new, start with the v1.5 base model. To get more models, put them in the folder named stable-diffusion-webui > models > Stable-diffusion.
Don’t forget to click the refresh button next to the dropdown menu to see new models you’ve added.
Crafting the Perfect Prompt
There’s a text box labeled Prompt. This is where you tell the program what kind of image you want.
For instance, if you type “A surrealist painting of a lion by Pablo Picasso,” that’s what you’ll get!
If you’re unsure what to type, there are guides and lists of words you can use to help you.
Negative Prompts
You’ll find another one below the Prompt text box for Negative Prompt.
Use this to tell the program what you don’t want in your image. This is useful when you’re using v2 models.
Fiddling with Image Size
Now let’s talk about Width and Height. These numbers will be the size of your image. For v1 models, set at least one side to 512 pixels.
For example, if you want a portrait image, you might set the width to 512 and the height to 769.
Batch Settings
The next two options, Batch Count and Batch Size, control how many images you make.
Batch Size is the number of images made in one go, and Batch Count is the number of times this process will run.
Usually, you’ll just change the Batch Size.
Guiding Your Model with CFG Scale
There’s a setting called CFG (Classifier Free Guidance) Scale.
The number guides how close the model sticks to your Prompt. A low number means the model won’t listen to your Prompt much. A high number means it will follow it very closely.
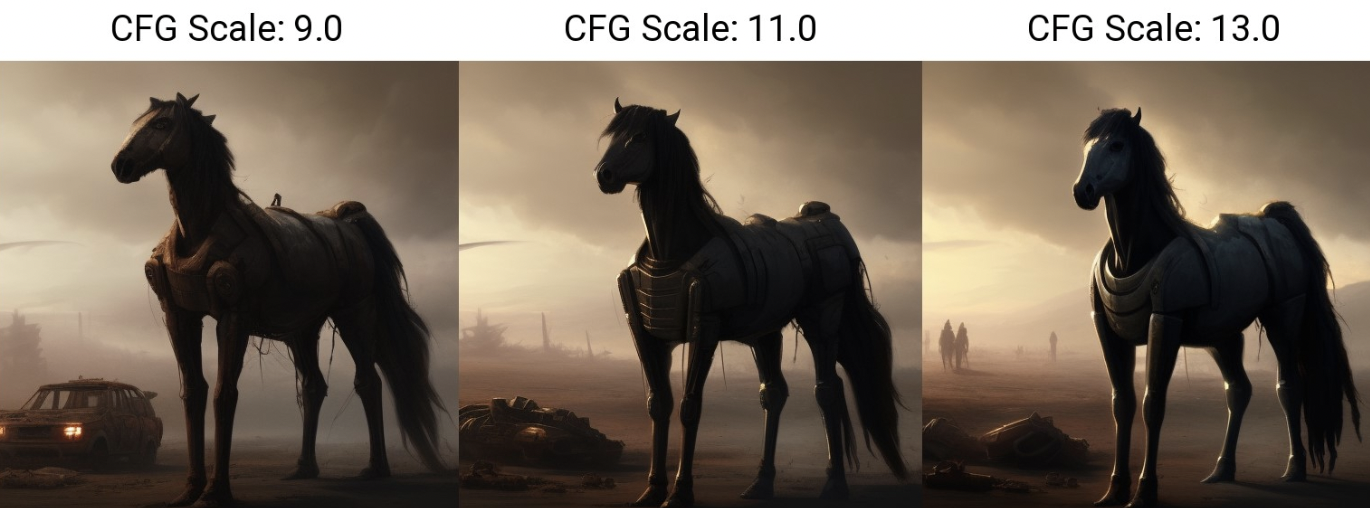
Try to find a balance that works for you.
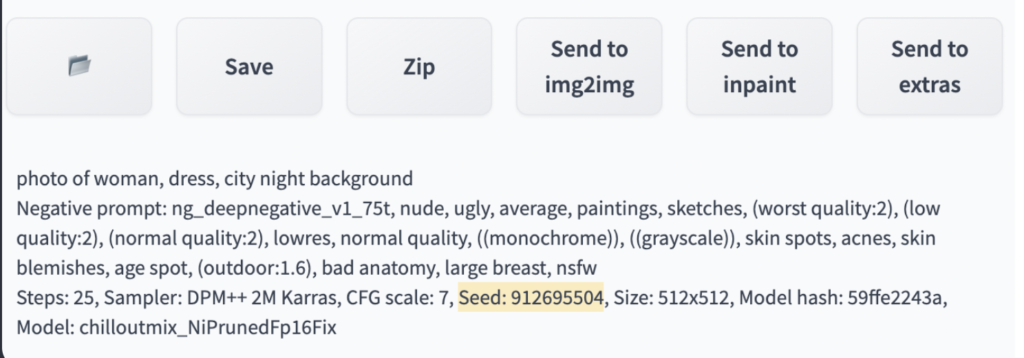
Seed and Variation
The Seed setting affects how your image turns out.
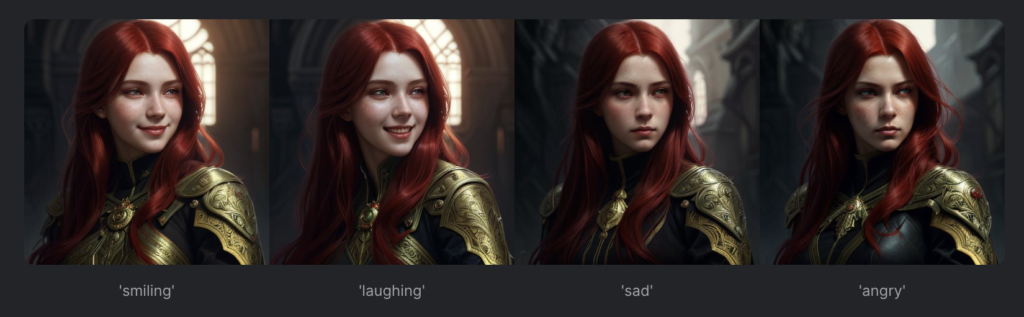
If you get an image you like but want to tweak it, you can use the same Seed again. For example: With the ‘picture of a female‘ prompt and seed number 438223945, we can alter the identical character by changing only the text prompt change to the facial expression.
You can find your image seeds here in the log message:
Changing one word that describes an emotion, while keeping the rest of the image the same (her hair, clothes, and background), completely alters her facial expression.
Learn more about Seed in Stable Diffusion from this guide.
An Extra Seed option lets you mix two Seeds to get something new and exciting.
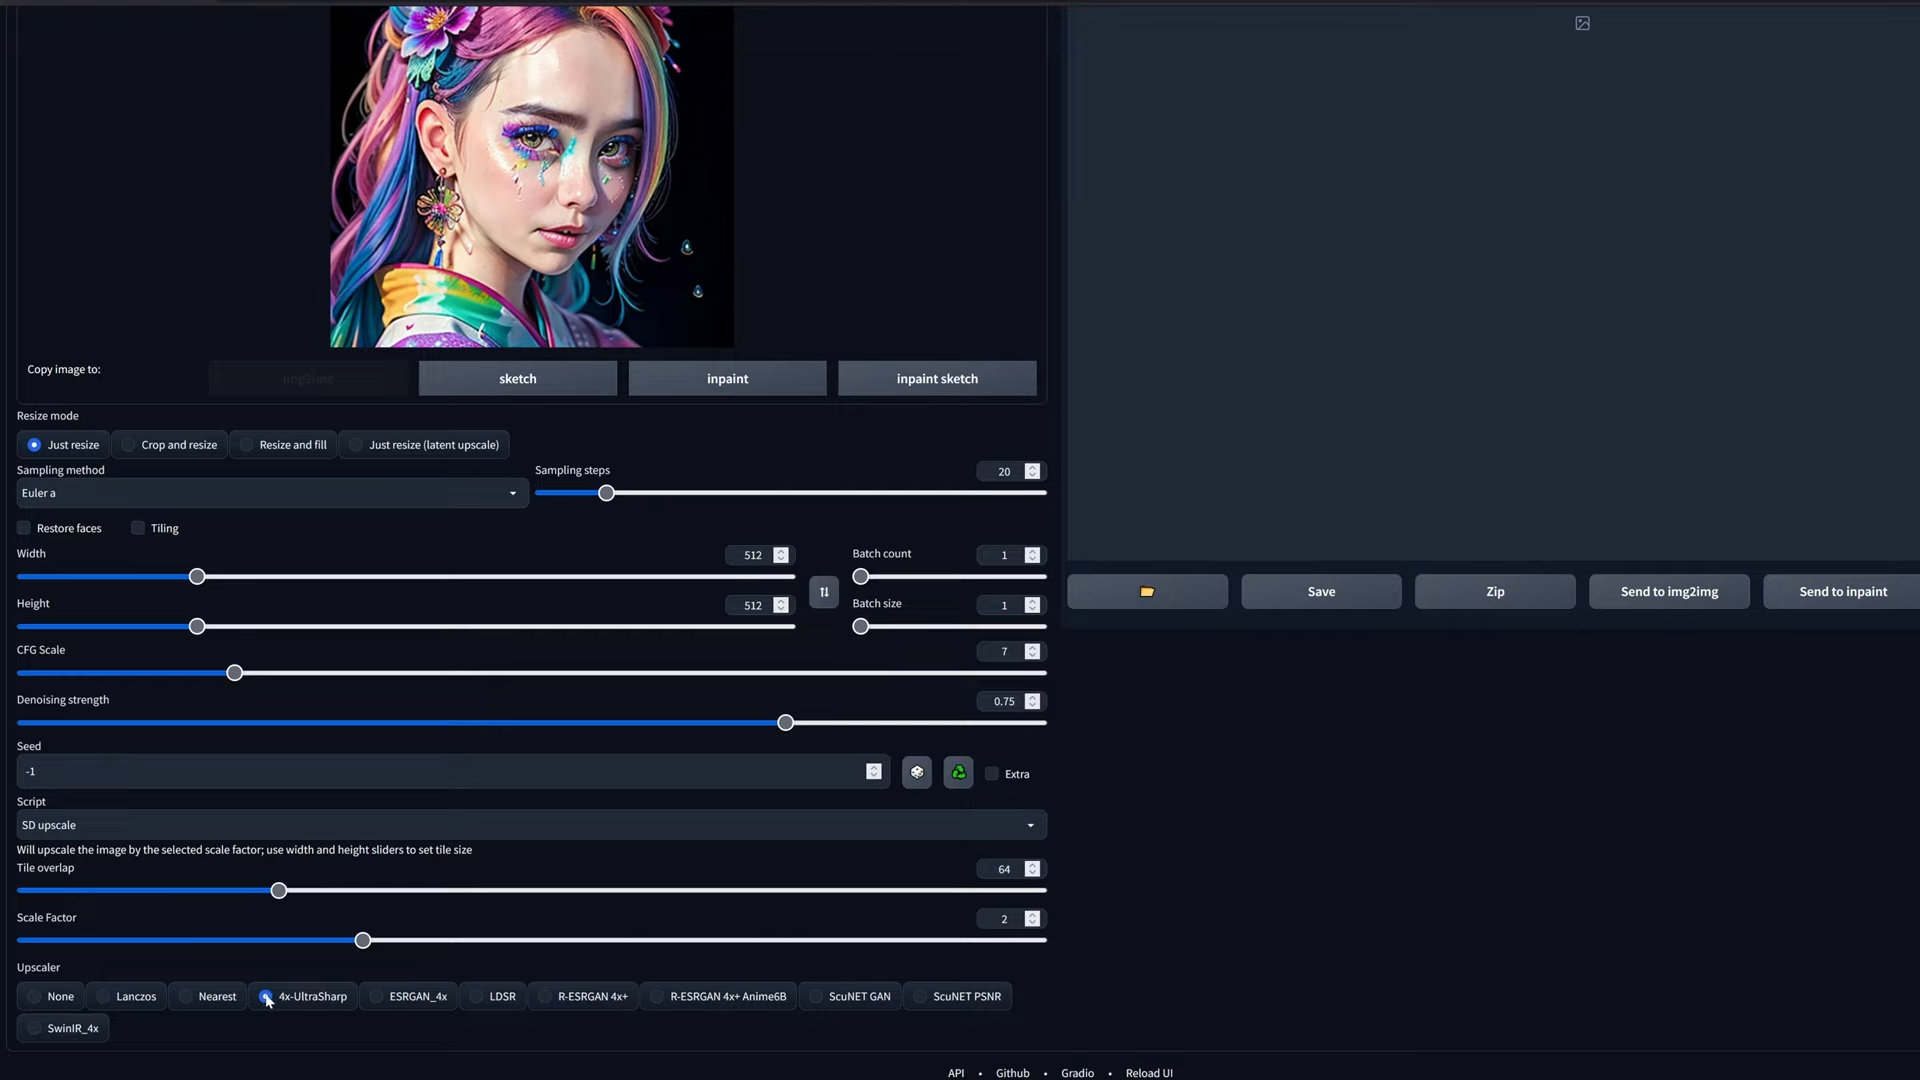
High-Resolution Fixes
If you want your image to be bigger than the default, there’s an option called Hires. fix.
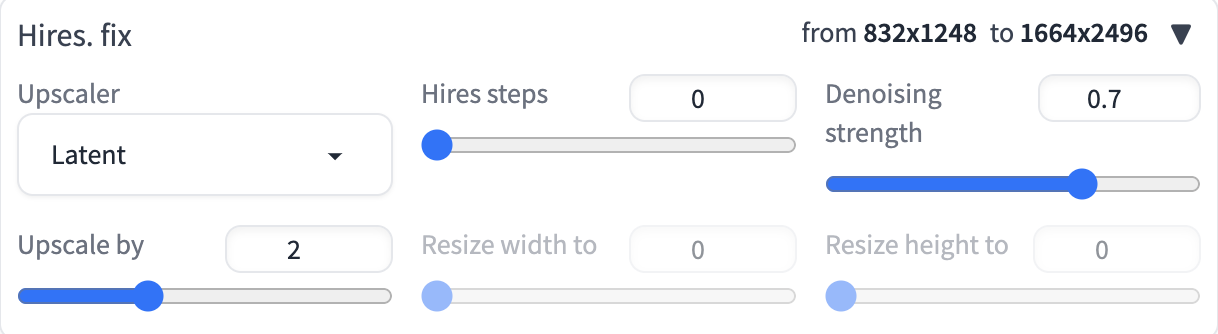
This scales up your photo after it’s made. In technical terms, it’s an option to render your image at a lower resolution, upscale it, and then add details at a high resolution.
Example:
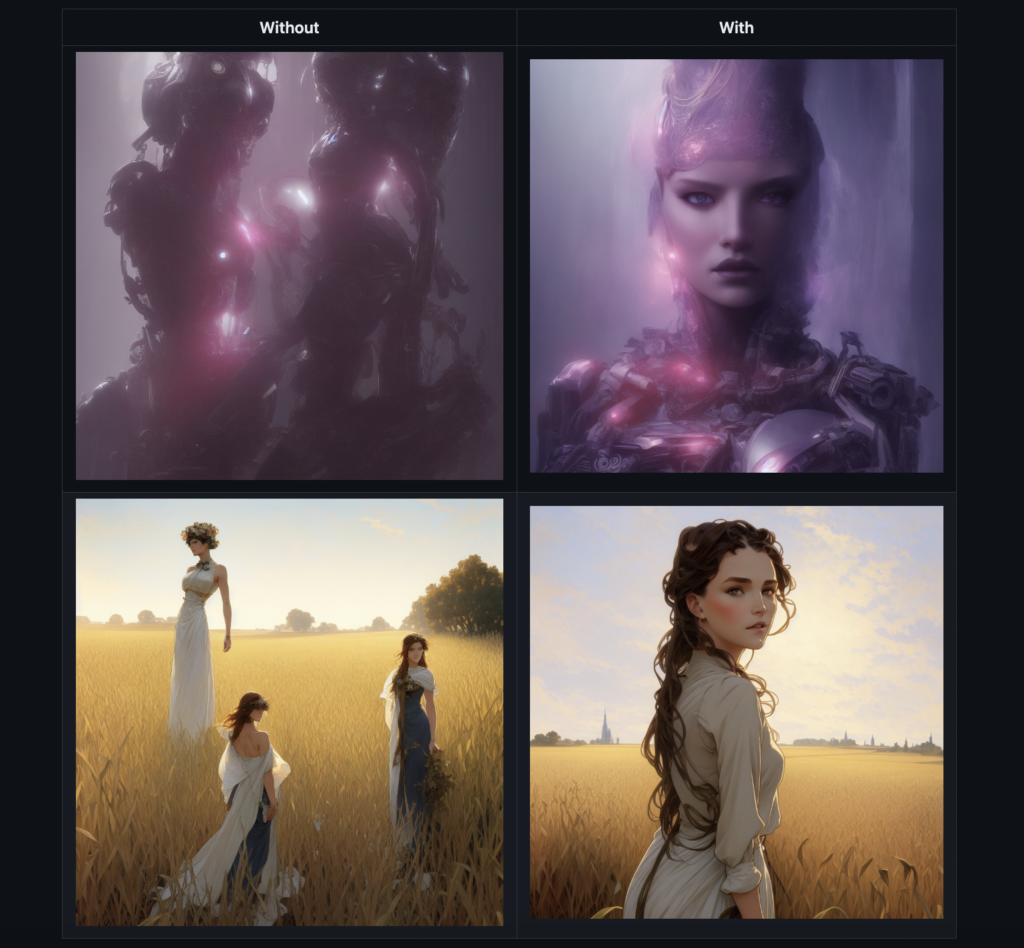
Since these models were only trained at 512px or 768px, the default behavior of SD1/2-based models is to produce terrible images at very high resolutions. This problem can be avoided with this method, which uses the composition of the small picture to clean up the bigger one.
Check the “Hires. fix” box on the txt2img page to turn it on.
You can set the size of a small picture using the width and height sliders. The size of a large image is set by three sliders: “Scale by” multiplier (Hires upscale), “Resize width to” and/or “Resize height to” (Hires resize).
- “Scale by” is used if both “Resize width to” and “Resize height to” are 0.
- If “Resize width to” is set to 0, “Resize height to” is figured out by adding width to height.
- If “Resize height to” is set to 0, “Resize width to” is figured out by adding width to height.
- If both “Resize width to” and “Resize height to” are not zero, the image is enlarged to at least those measurements, and some parts are cut off.
You can choose which upscaler to use and how many steps it should take to get there.
Face Restoration
The Restore Faces option fixes any issues on faces in your images. Before using it, go to the Settings tab and pick a model under the Face Restoration section.
Tiling Your Images
If you want to create a repeating pattern, use the Tiling option. Just turn it on, and you’ll get an image that can be used like wallpaper.
Exploring the Generate Button and Its Surrounding Controls
So, you’ve filled out all your settings and are now ready to hit that Generate button.

But before you do, you should know there’s more than just that one button to explore.
Here’s the breakdown of the buttons right under the Generate button, from left to right:
Read the Last Parameters
This button is a life-saver when you want to recreate the same image you just generated.
It populates all the fields with the last used parameters, ensuring you generate identical images.

Note that it will also set the Seed value and the Model override. If you want to adjust, change the seed to -1 and remove the override.
Trash Icon
A trash bin icon that acts just like a real one. Clicking it will completely remove the current Prompt and the Negative Prompt. A handy feature when you want to start afresh.
Model Icon for Extra Networks
This button looks like a model or network icon.
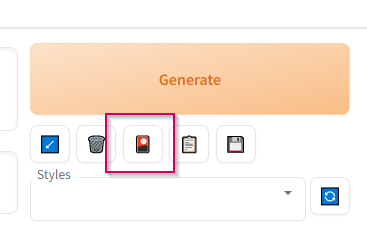
When pressed, it gives you advanced options for hypernetworks, embeddings, and LoRA phrases that you can add to your prompt for specialized image generation.
Load Style
This allows you to insert saved styles into the Prompt and Negative Prompt. The styles could be anything from an artist’s name to a full-blown prompt.
You can select multiple styles from the dropdown menu.
Save Style
Done with creating a style you like? Save it for later use by clicking on this button. You’ll need to give the style a name for future identification.
Managing Your Generated Images
After generating your images, you’ll see another row of buttons that allow you to manipulate the output. Here they are, from left to right:

Open Folder
This button opens the folder where your generated image resides. It might not work on all systems, but when it does, it’s a quick way to locate your files.
Save
You can save the generated image to your computer. Once you click this button, a download link appears below. If you’ve generated multiple images in a grid, clicking this will save all of them.
Zip
This button lets you compress your image or images into a Zip file, making it easier to download multiple files at once.
Send to img2img
This option sends the selected image to the img2img tab, where you can perform additional modifications.
Send to Inpainting
If your image needs some touch-ups or you want to remove imperfections, this button sends the selected image to the inpainting tab under the img2img section.
Send to Extras
Lastly, if you want to apply some additional features or filters to your image, this button sends it to the Extras tab.
Now, you are fully equipped to navigate every inch of the txt2img tab and its surrounding features in AUTOMATIC1111.
Final Steps
After you’ve picked all your settings, click the Generate button. In a little bit, you’ll get your image. You can even save it to your computer by right-clicking on it.
Diving Deeper into the img2img Tab on AUTOMATIC1111
If you thought AUTOMATIC1111 was all about text-to-image generation, hold your horses!
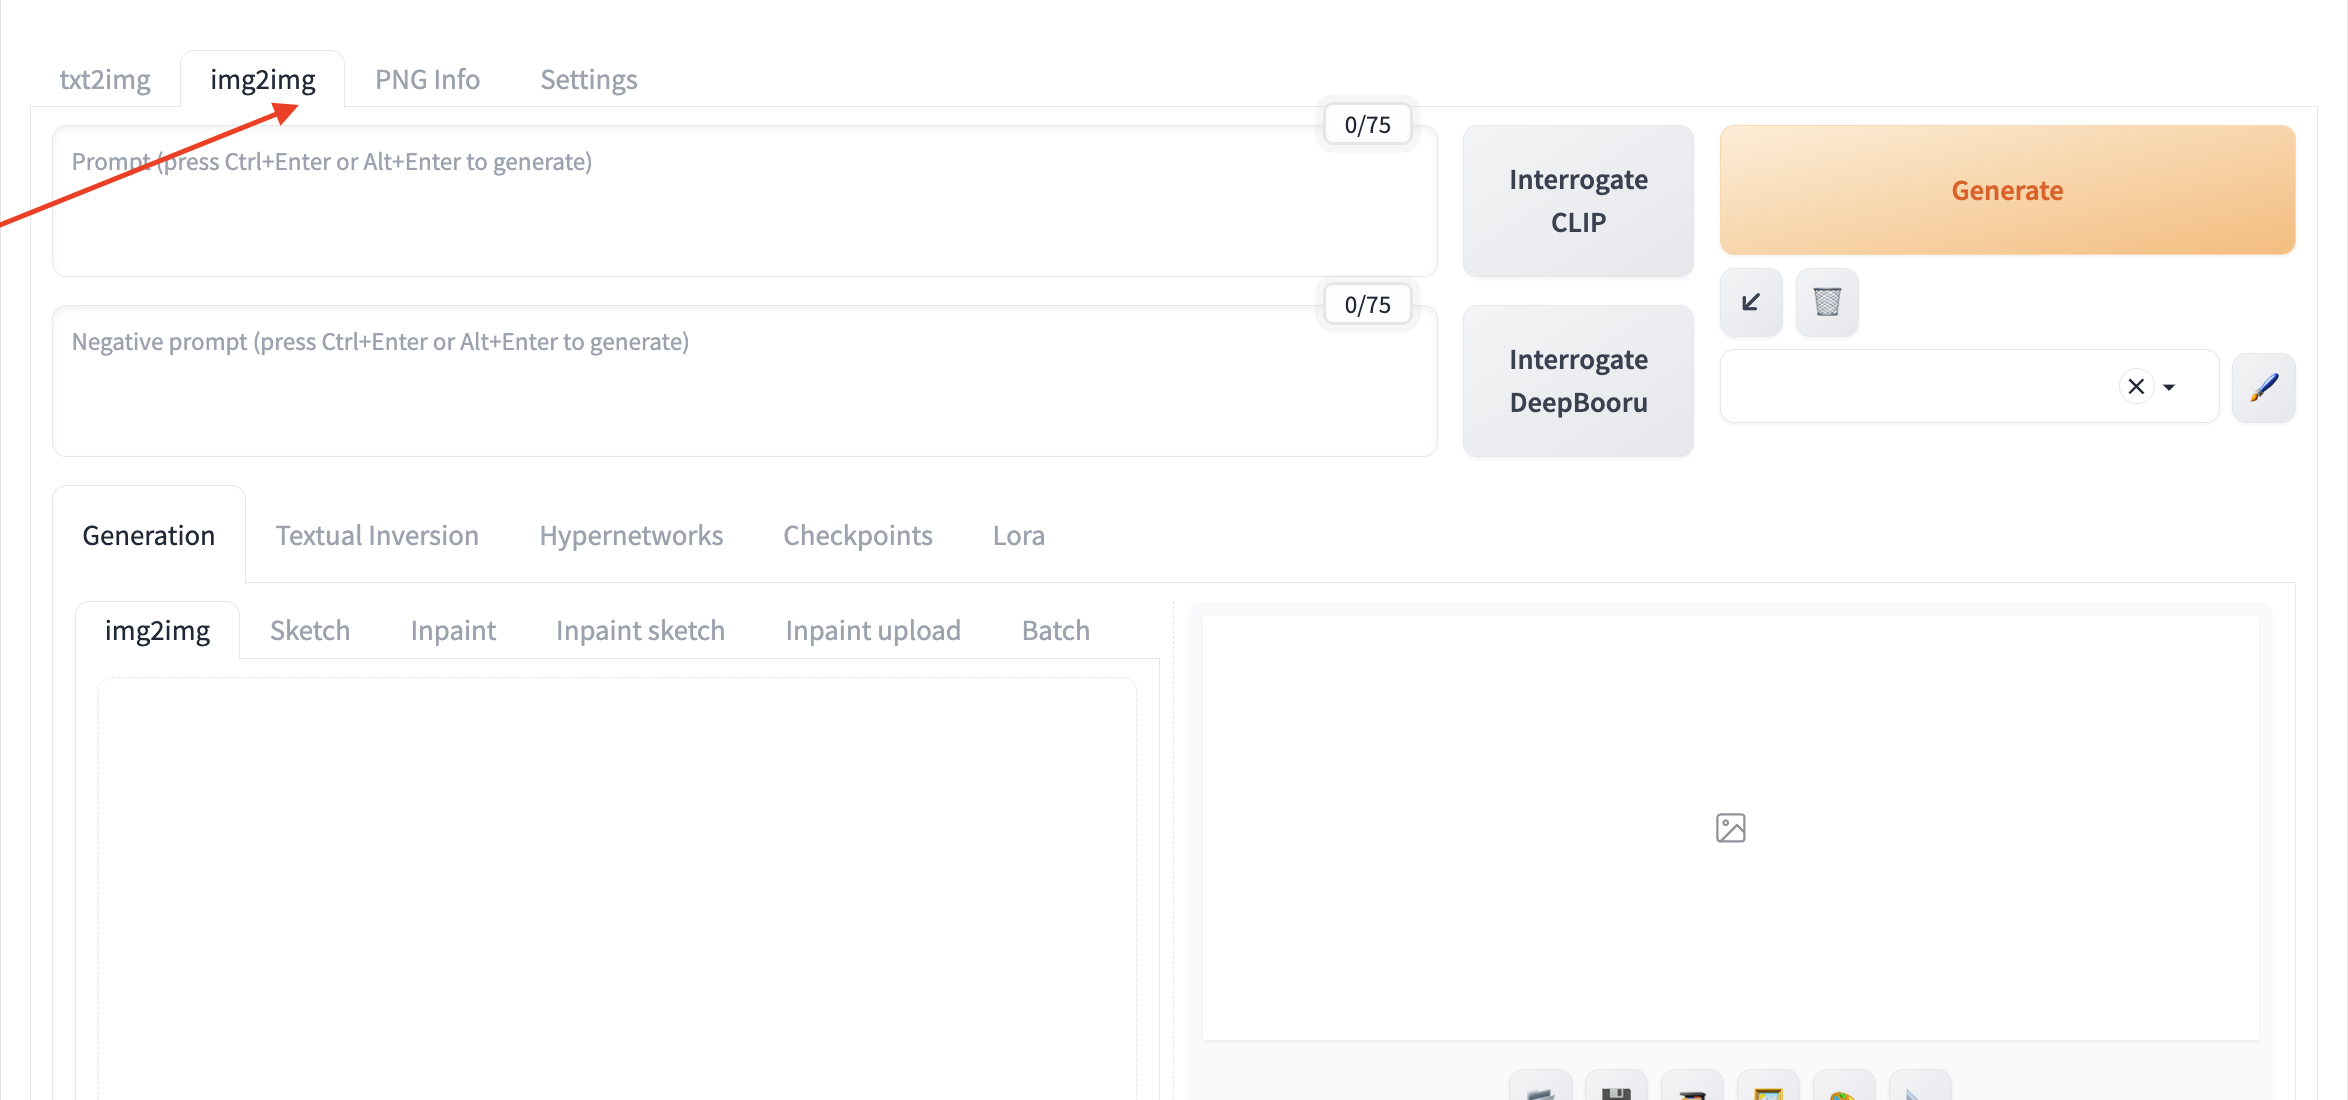
The platform also offers a dedicated img2img tab that’s a treasure trove of image manipulation functions. Let’s explore the nuts and bolts of what you can do here.
Img2Img Transformation
A popular use of the img2img tab is image-to-image transformation. This lets you create a new image that mimics the composition of an original image you provide.
Step 1: Upload Your Base Image
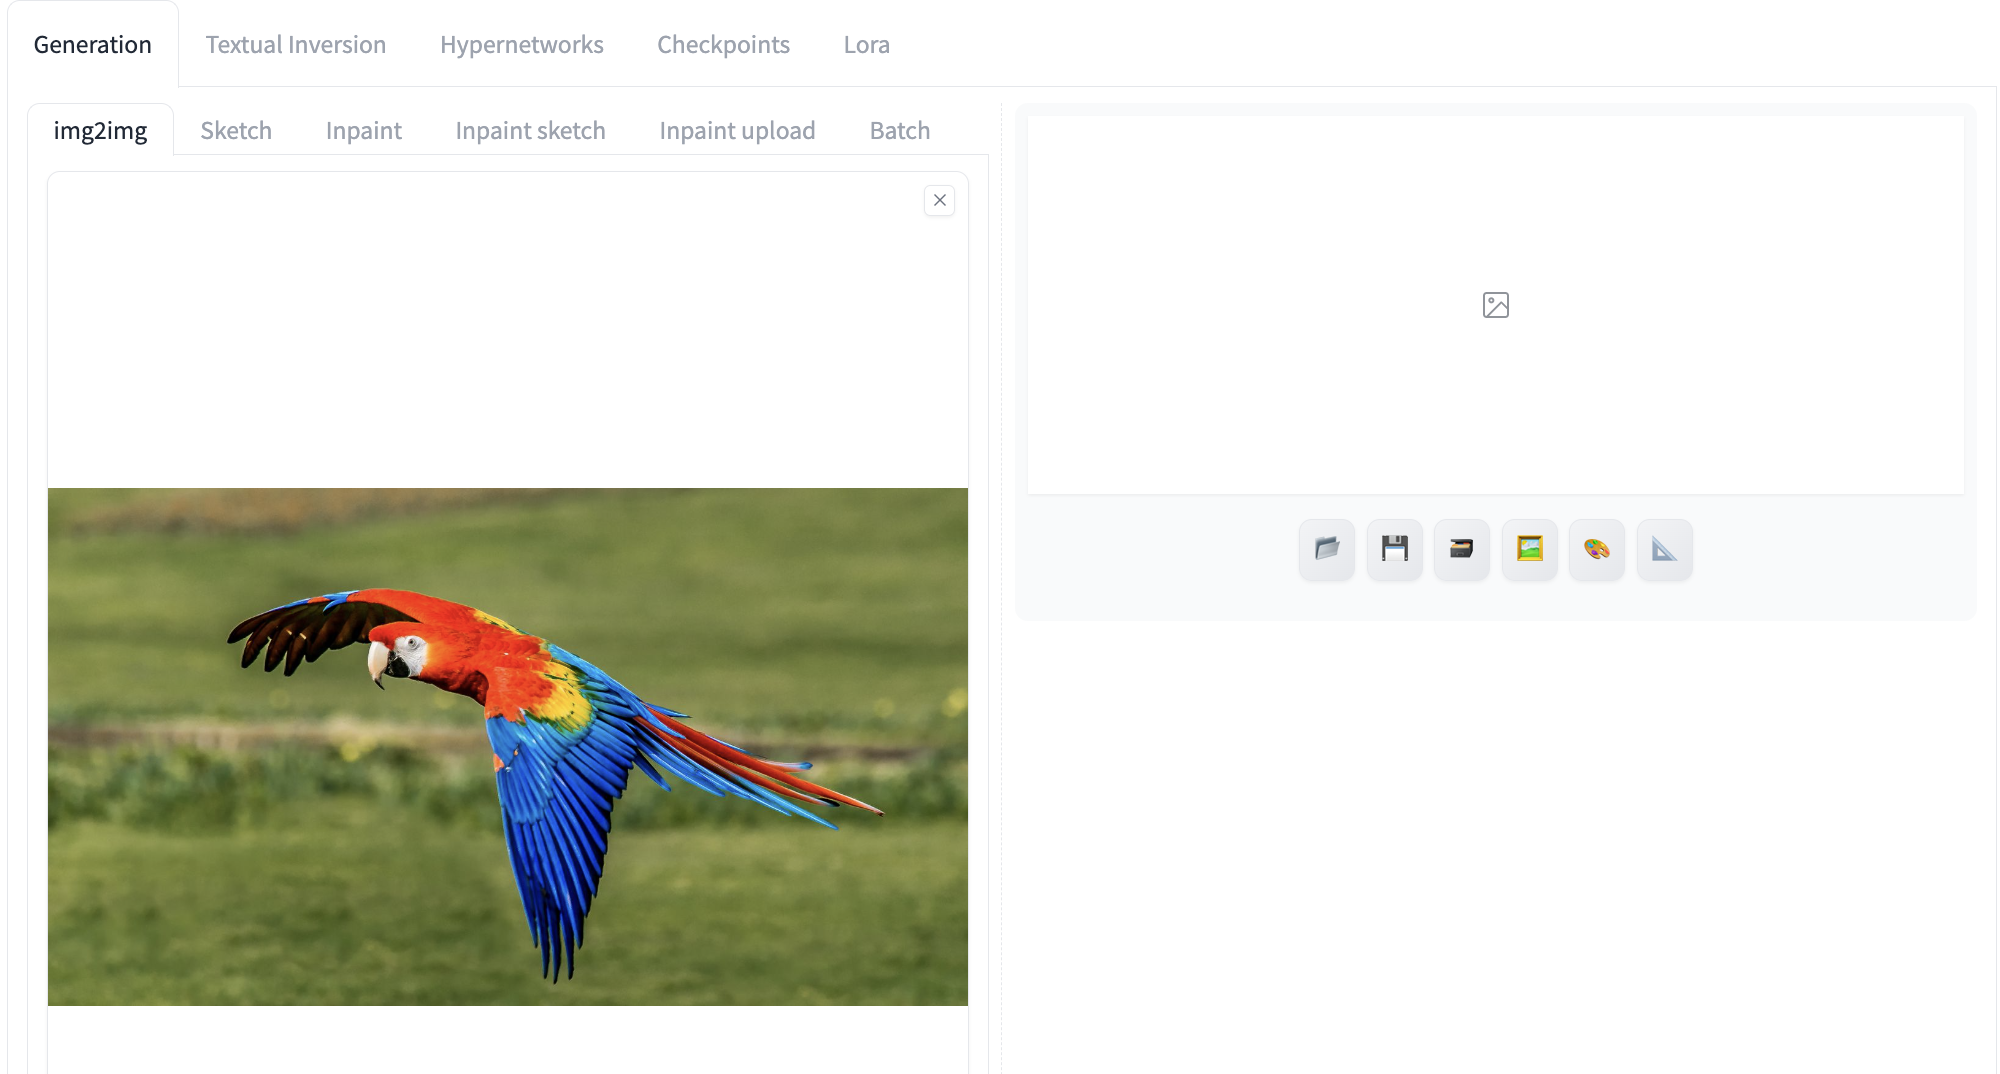
To kickstart this process, you’ll need to drag and drop your base image into the img2img tab.
Step 2: Set the Aspect Ratio

Adjust the width and height so that your new image has the same aspect ratio as the base image. A rectangular frame will appear to help you.
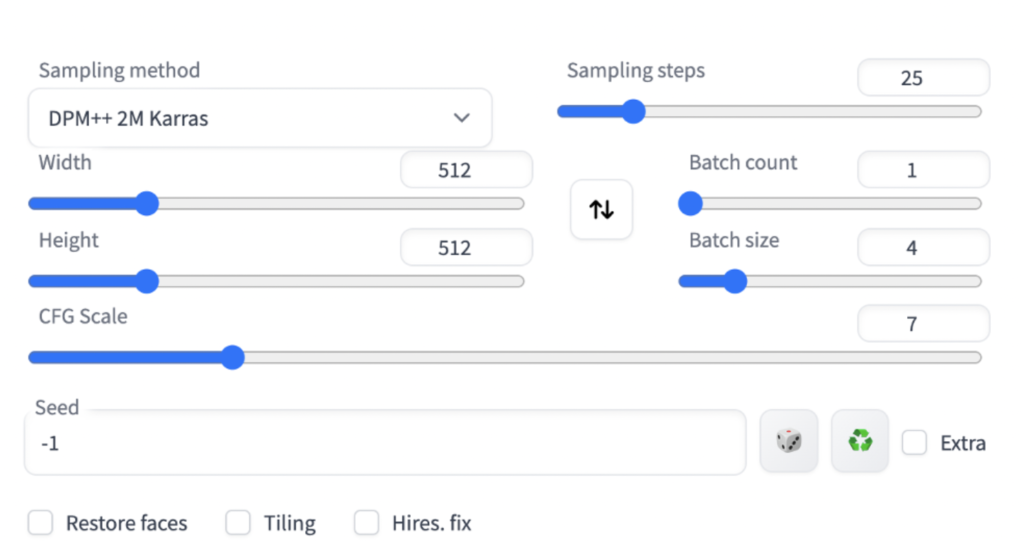
Step 3: Sampling Settings
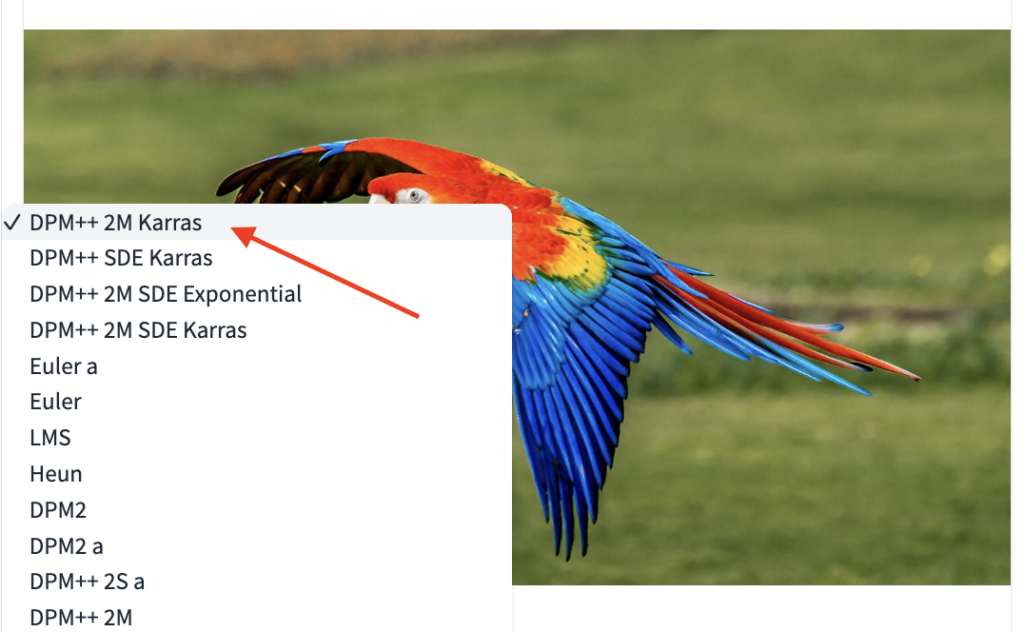
You can pick a sampling method and the number of steps it will take.
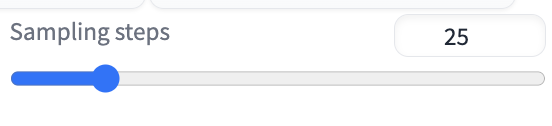
A typical choice is DPM++ 2M Karass with 25 steps.
Step 4: Batch Size Matters
You should set the batch size, usually to 4, before proceeding.
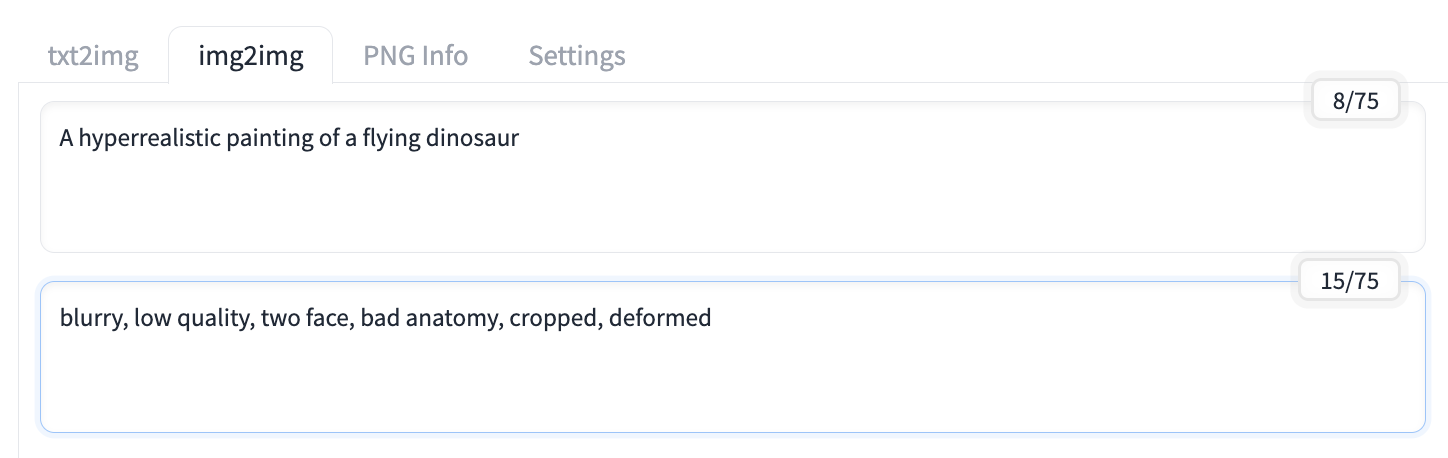
Step 5: Crafting the Perfect Prompt
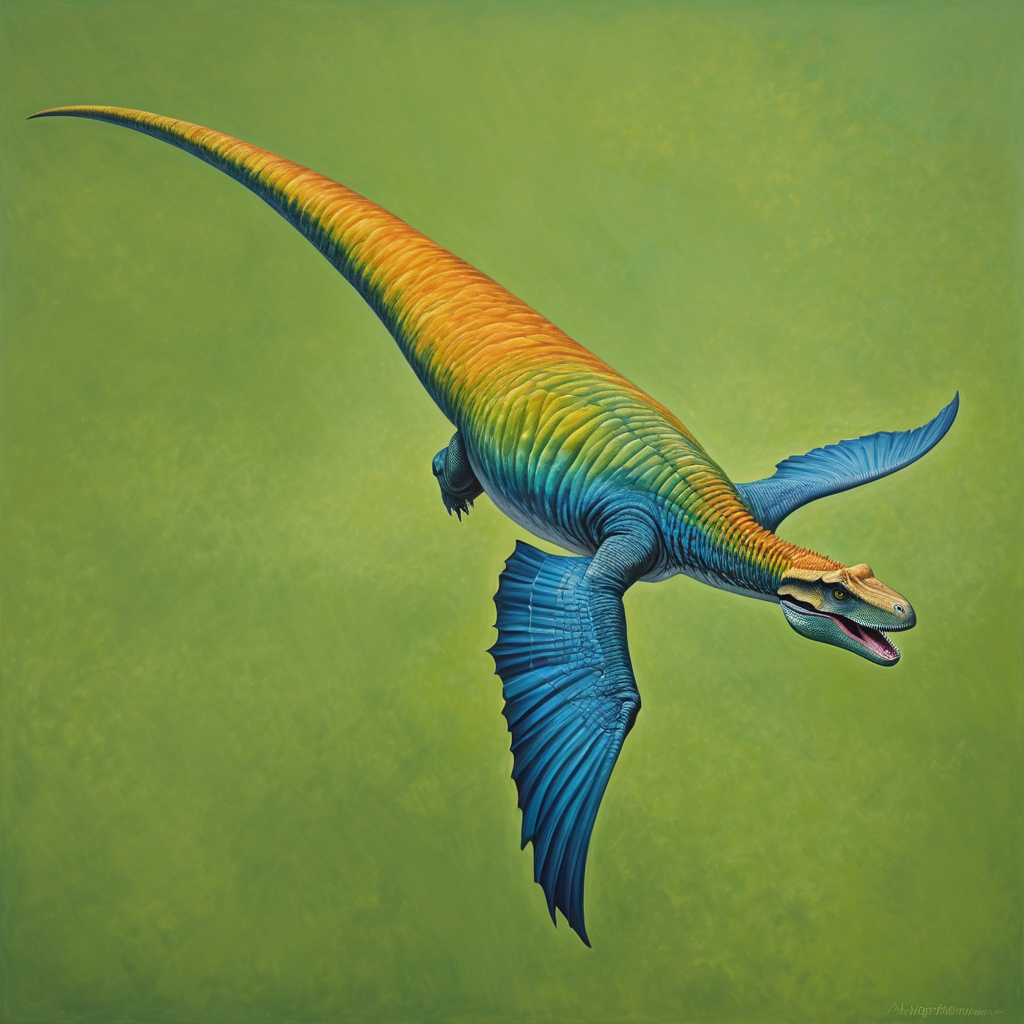
Now, you write a prompt for the new image. For example, “A hyperrealistic painting of a flying dinosaur.” Also add your negative prompts which you can copy from this resource: Stable Diffusion Negative Prompts.
Step 6: Time to Generate!
Hit that Generate button and adjust the denoising strength for the perfect image. For us, a denoising strength of 0.75 generated a perfect image.
New Image Adjustments
These are settings unique to img2img:
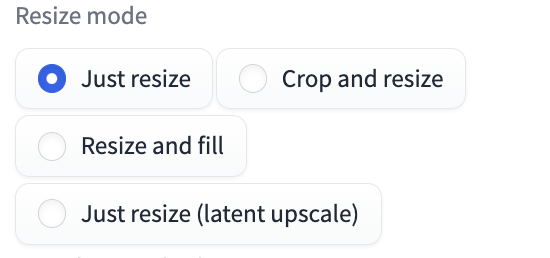
- Resize Mode: This handles the aspect ratio between input and output images. There are four options, including “Just resize,” “Crop and resize,” “Resize and fill,” and “Just resize (latent upscale).”
- Denoising Strength: This adjusts how much your image will transform. A value of 0.75 is usually a good place to start.

Sketch Your Way in AUTOMATIC1111
If you prefer drawing over uploading, the sketch function lets you create initial pictures.
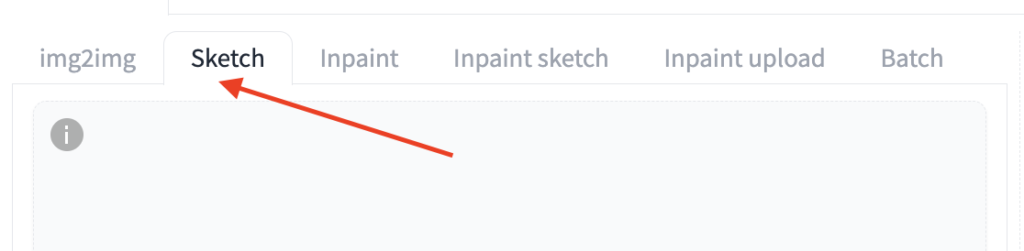
Steps for Using Sketch:
- Navigate to the sketch tab.
- Upload a background.
- Enable the color sketch tool and get sketching.
- Write a prompt, say “award-winning house.”
- Generate your image!
This function isn’t just for new images. You can also modify existing images. For example, you can paint over an area you don’t like and regenerate the image.
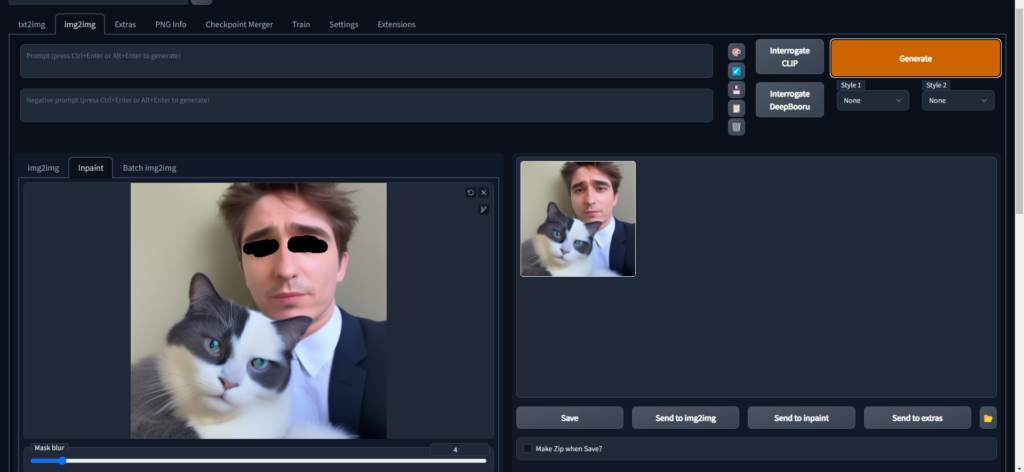
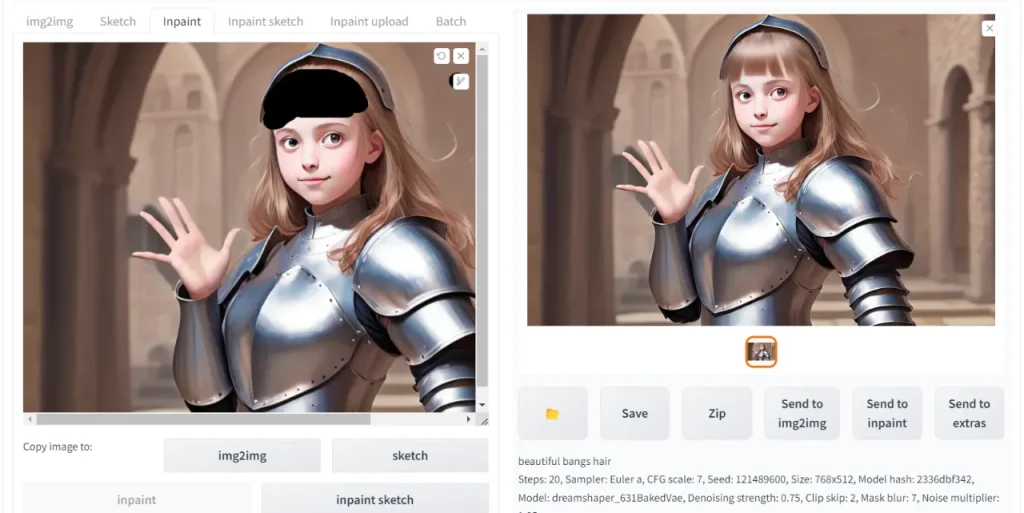
Inpainting: Fixing Imperfections
If you generated an image with a minor flaw, don’t worry! Inpainting is your best friend here.
How to Use Inpainting:
- Use the “Send to inpaint” function to transfer the image from the txt2img tab.
- Use the paintbrush tool to mark the area you want to improve.
- Tweak the denoising strength and other settings.
- Generate the new image.
Handy Keyboard Shortcuts for Zoom and Pan
Struggling with small details? Use these shortcuts to zoom and pan the image. They also work in the Sketch and Inpaint Sketch tabs.
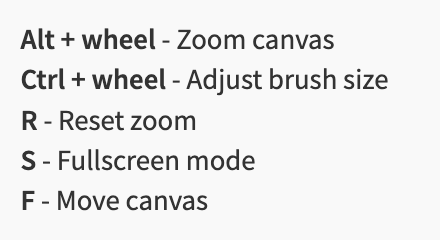
- Alt + Wheel: Zoom in and out.
- Ctrl + Wheel: Adjust the brush size.
- F + Move Cursor: Pan around.
Other Cool Features
- Inpaint Sketch: Combines inpainting with sketching for selective regeneration.
- Inpaint Upload: Allows you to upload a mask file instead of drawing it.
- Batch Mode: For mass inpainting or image-to-image transformations.
- Get Prompt from Image: The Interrogate CLIP and Interrogate DeepBooru buttons guess the prompt of the uploaded image, It is extremely helpful if you’re working with an image without a known prompt.
How to Easily Upscale Images with AUTOMATIC1111
Ever wondered why you should upscale an image? AUTOMATIC1111 lets you make your pictures bigger without losing quality.
It uses AI that you usually can’t find on your PC. You get to do this for free without paying any extra money.
Simple Steps to Upscale an Image
1. Go to the Extra Page
Open AUTOMATIC1111 and click on the ‘Extra‘ tab.
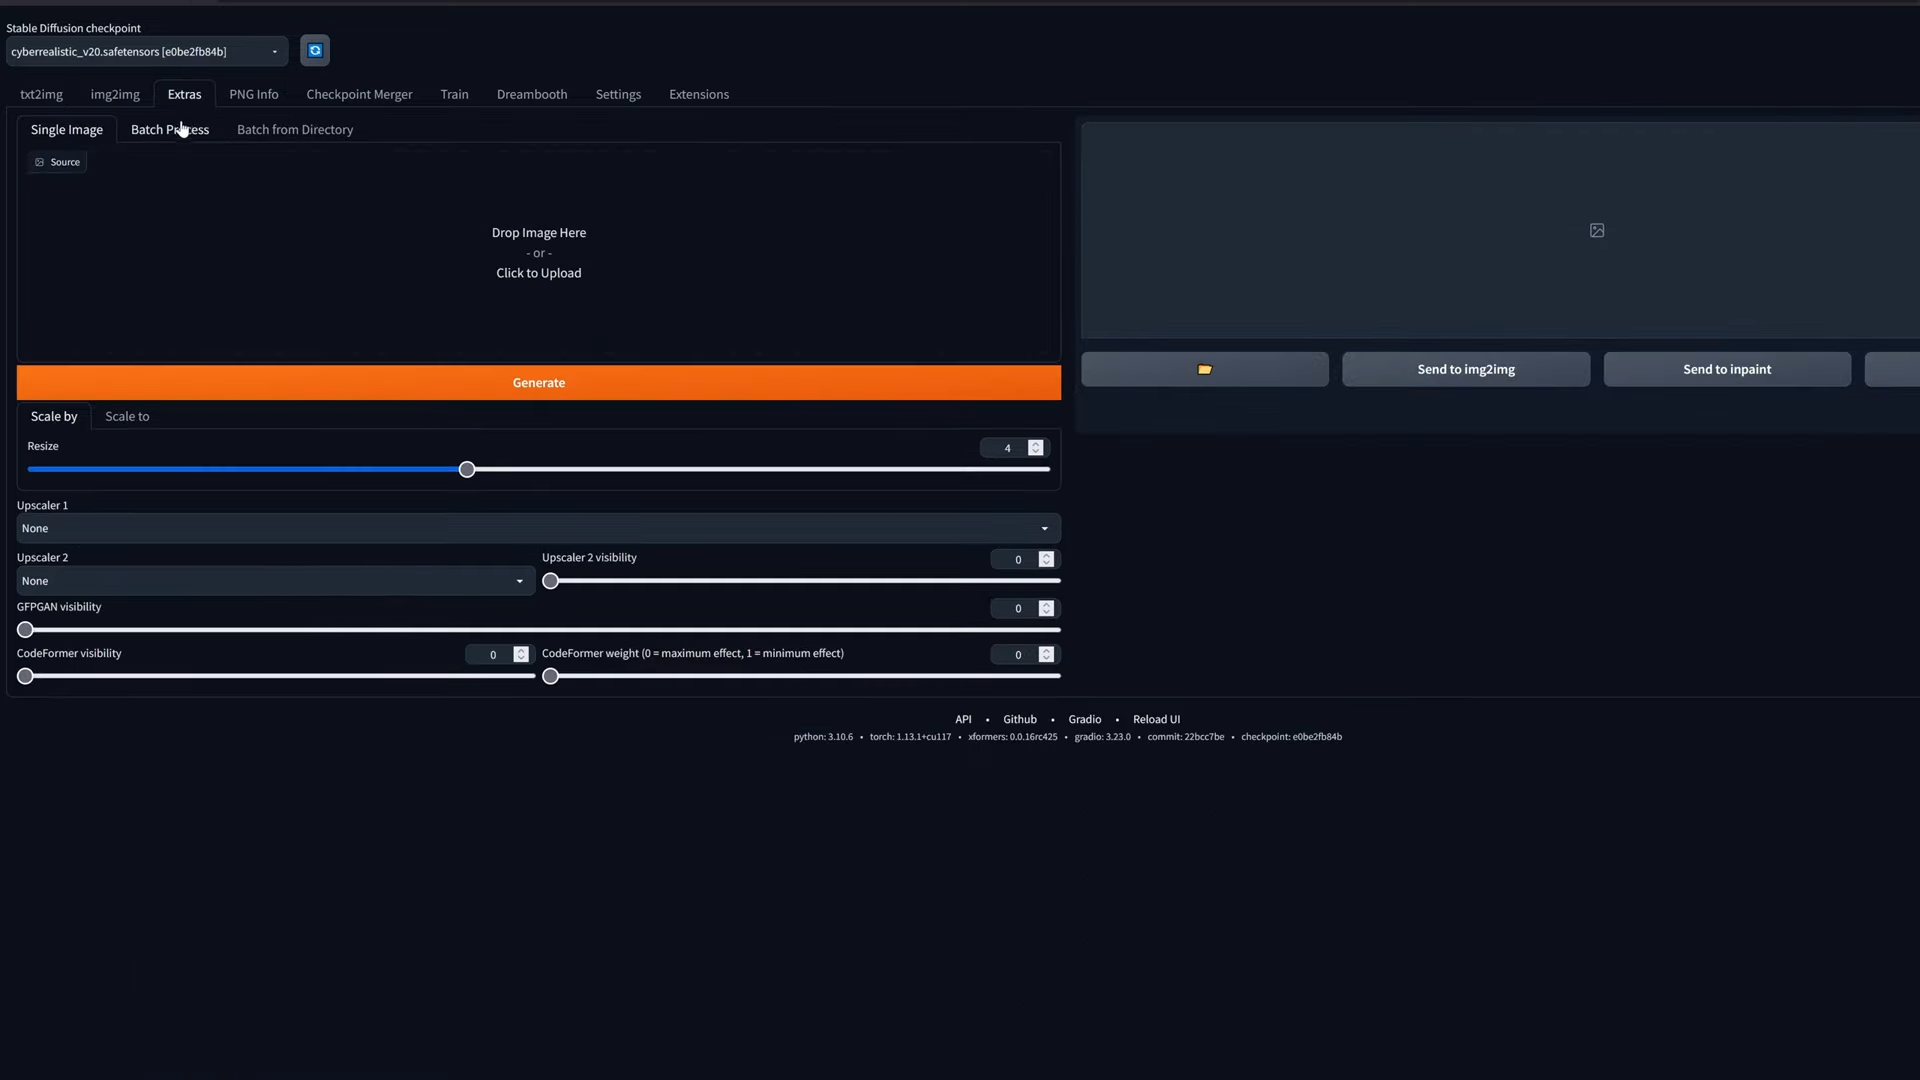
2. Upload Your Image
Put your image on the canvas.
3. Set the Scale
Look for the ‘resize‘ label and set ‘Scale by factor‘.
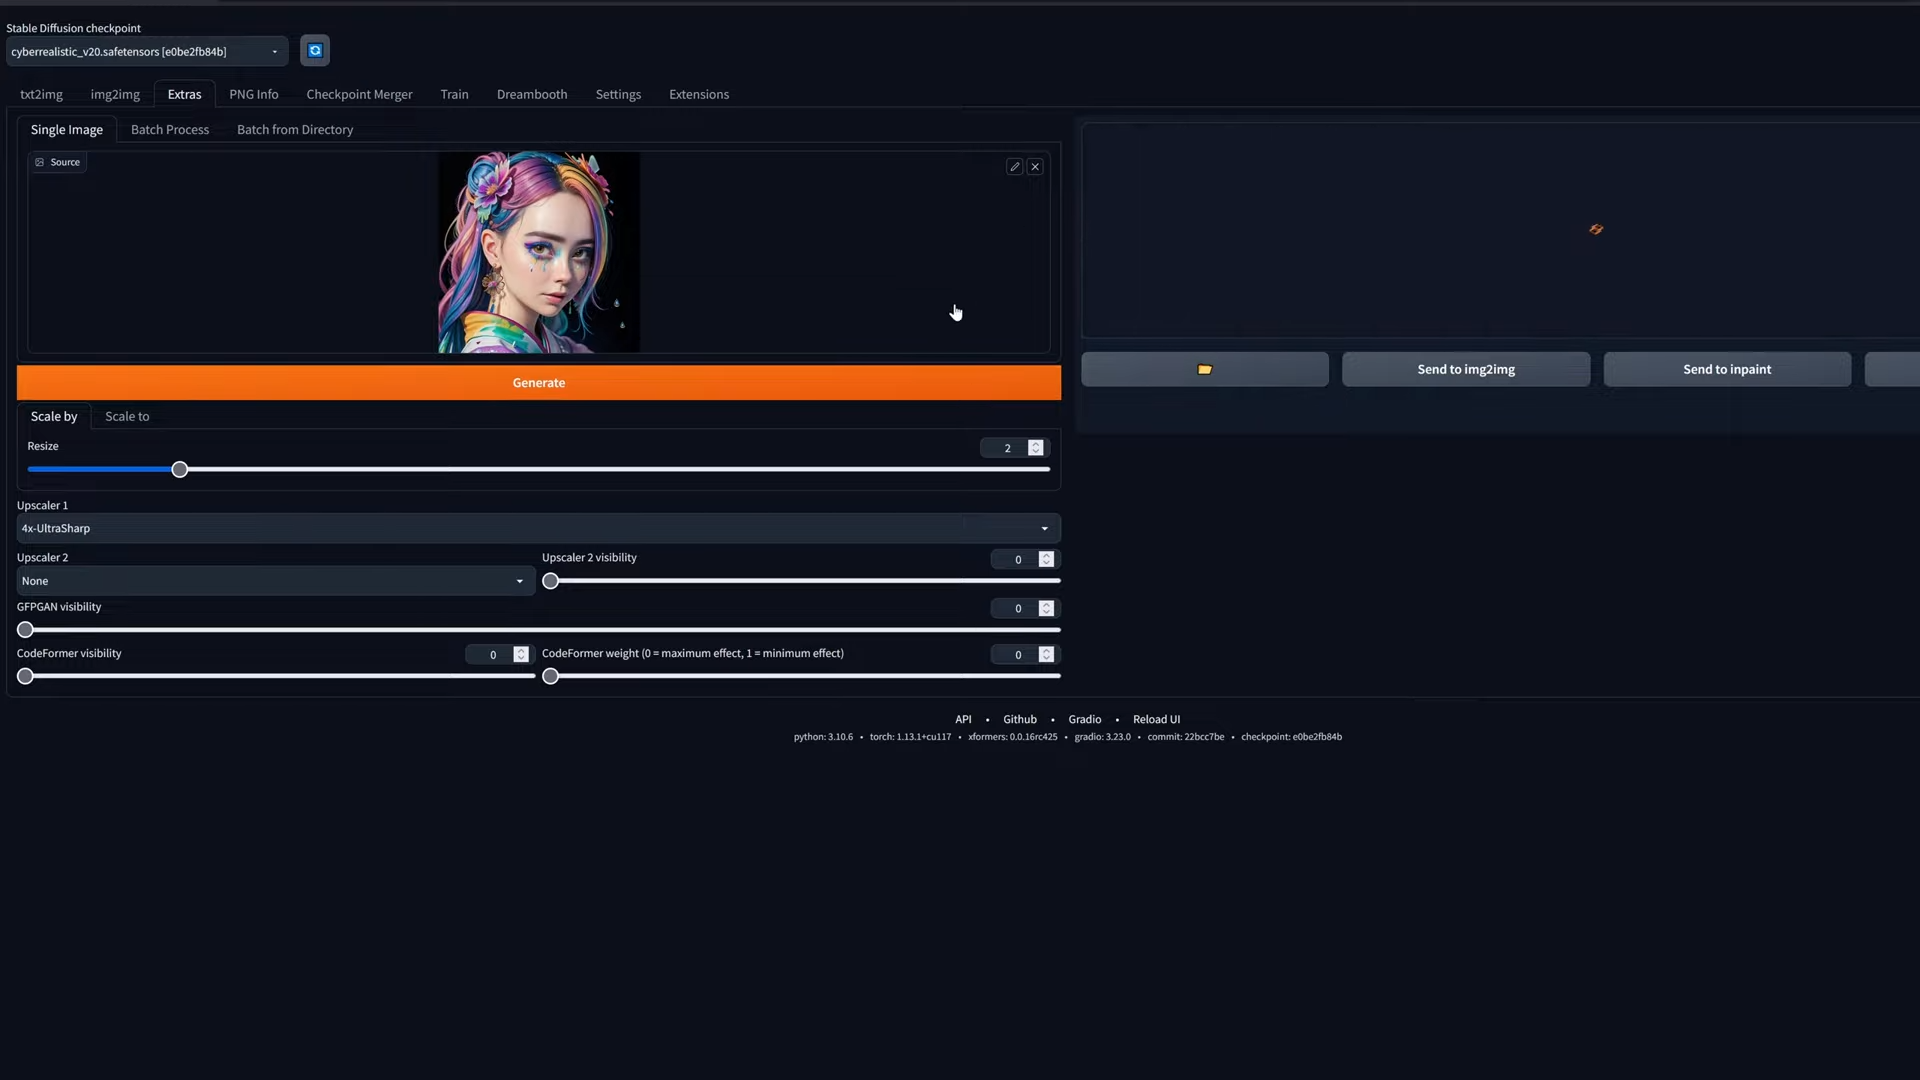
Generate: Click ‘Generate‘ to see your new, bigger, much better-upscaled image on the right.
Keep Track of Your Settings with PNG Info
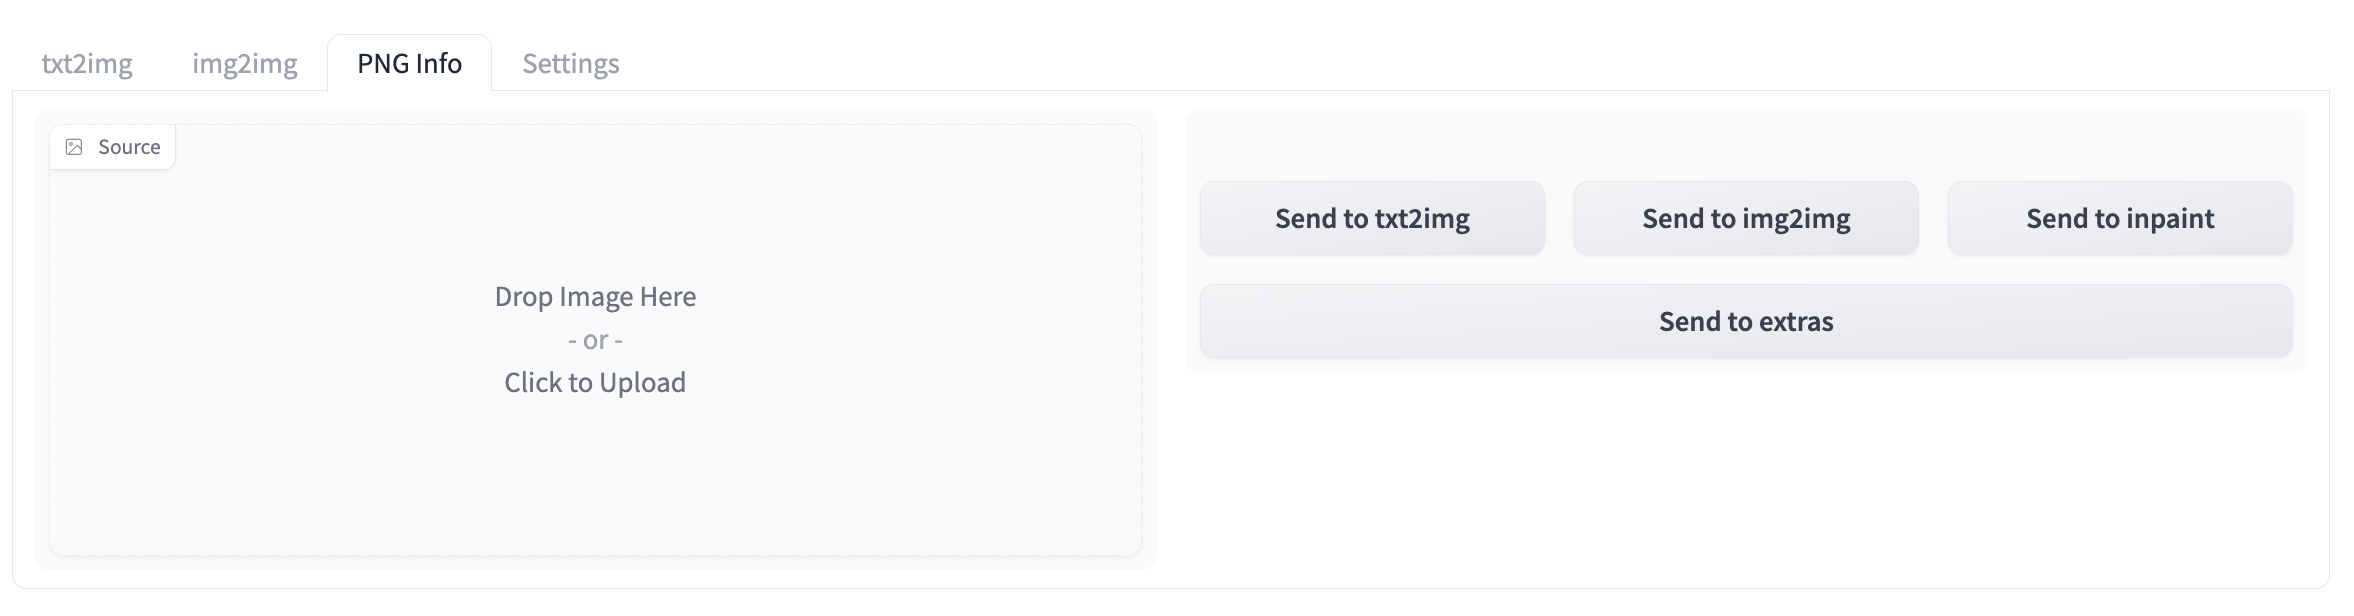
When AUTOMATIC1111 makes your image, it keeps all the settings safe.
You can see these settings later if you want. This is great if you find an image online and wonder how it was made.
Add More Features with Extensions
Want more tools? You can add them yourself. Just go to the Extension Page, put in the web address of the tool you want, and wait for it to install.
Once it’s done, restart AUTOMATIC1111, and your new tools will be there.
Mix Models with Checkpoint Merger
AUTOMATIC1111 lets you mix up to 3 models. It’s a way to get new styles. But be careful. Sometimes, the mix might not look how you want.
How to Mix Models
- Pick your main models (like A, B, C).
- Choose how to mix them. You can use weighted sums or add differences.
Quick Settings for a Smooth Experience
AUTOMATIC1111 lets you change lots of settings. Some are good to know right away. Like ‘Face Restoration’, pick CodeFormer. And in Quick Settings, you can set up custom shortcuts. For example, you can set shortcuts for Clip Skip and custom image folders. After saving, these new shortcuts will show at the top, making your work faster and easier.
Remember to always hit ‘Apply settings’ after you make any changes.
With this guide, you’re all set to get the most out of AUTOMATIC1111. From upscaling images to blending models, you’re now equipped to do it all with ease.
Must-Have Extensions for Mastering AUTOMATIC1111 and Stable Diffusion WebUI
We all love AUTOMATIC1111’s Stable Diffusion WebUI. But did you know you can make it even better?
Yes, with extensions! Let’s dive into some must-have tools to elevate your experience.
1. ControlNet
- Where to Get It: ControlNet GitHub Page
- What It Does: With ControlNet, you can copy poses, colors, and much more from one image to another. It’s like a magic wand for your prompt-building skills!
2. Image Browser
- Where to Get It: Image Browser GitHub Page
- What It Does: Forget File Explorer or Finder. View and search your older images right in AUTOMATIC1111. It’s a total game-changer!
3. Canvas Zoom
- Where to Get It: Canvas Zoom GitHub Page
- What It Does: Small canvas, no more! Zoom and adjust brush sizes with easy keyboard shortcuts. Great for detail work!
4. Ultimate SD Upscale
- Where to Get It: Ultimate SD Upscale GitHub Page
- What It Does: Want bigger images? This tool lets you do that, even if you don’t have a fancy GPU. It makes your pictures big and beautiful.
5. After Detailer
- Where to Get It: After Detailer GitHub Page
- What It Does: It fixes faces and hands in your images. You’re way more likely to get a great picture with this!
6. Regional Prompter
- Where to Get It: Regional Prompter GitHub Page
- What It Does: Want to change only part of an image? This tool lets you do just that. You can add special colors or items easily.
7. OpenPose Editor
- Where to Get It: OpenPose Editor GitHub Page
- What It Does: Edit poses in your images for even more control. It works great with ControlNet.
8. Civitai Helper
- Where to Get It: Civitai Helper GitHub Page
- What It Does: Download models straight in AUTOMATIC1111. No more folder mess!
Optional But Handy Extensions
1. Style Selector for SDXL
- Where to Get It: Style Selector GitHub Page
- What It Does: Add styles to your prompts. It’s super easy and fun!
3. Aspect Ratio Selector
- Where to Get It: Aspect Ratio Selector GitHub Page
- What It Does: Forget counting pixels. This tool sets your image size with one click.
Extensions for Making Videos
1. Deforum
- Where to Get It: Deforum GitHub Page
- What It Does: Make crazy fun videos that look like art!
2. AnimeDiff
- Where to Get It: AnimeDiff GitHub Page
- What It Does: Create short videos from your prompts.
3. Text2video
- Where to Get It: Text2video GitHub Page
- What It Does: Turn text into cool videos. It’s that simple.
These extensions will make your AUTOMATIC1111 and Stable Diffusion experience so much better. Try them and see for yourself!
Tips and Tricks for Using AUTOMATIC1111 More Efficiently
Here are some extra tips and tricks for you to use AUTOMATIC1111in the best way possible:
1. Easily Reuse Settings with Drag and Drop
You don’t have to fiddle with text files to reuse settings for your image generations quickly. Just drag the generated image into the prompt box. The settings will show up there.
Then, click the blue button with a diagonal arrow below the ‘Generate’ button to load those settings.
Note: the model checkpoint won’t show in the dropdown. You’ll need to select it manually.
2. Get Notified When Job is Done
Want to know when a long job is complete? Place an MP3 file named ‘notification’ in AUTOMATIC1111’s base folder.
Restart the GUI, and you’ll get a sound notification when a job finishes.
3. Use “Generate Forever” for Continuous Output
Tired of hitting ‘Generate’ repeatedly? Right-click on the ‘Generate‘ button and choose ‘Generate Forever‘.
It will keep creating images with the settings you’ve picked. To stop, right-click on the ‘Generate‘ button again and select ‘Stop Generating Forever‘.
4. Customize Quick Settings for Easy Access
Some settings like ‘Image-to-Image Upscaler’ are deep inside the settings tab but used frequently.
You can place them at the top of the GUI for easy access. Go to the settings tab, then the interface sub-tab, and scroll down to ‘Quick Settings’. Add the settings you use often, then restart the GUI to apply the changes.
5. Use Keyboard Shortcuts for Emphasis
In the prompt, you can highlight words and use Ctrl + Up to increase emphasis or Ctrl + Down to decrease it.
It saves time compared to typing brackets and numbers manually. You can also adjust the increment levels in the settings.
6. Fine-Tune Image Details with Prompt Editing
Found a good image but need to tweak the details? Use prompt editing to add to the prompt without changing the composition.
Wrap your added text in brackets and use a colon and a number to specify when it takes effect during generation.
7. Speed Up XYZ Plots with RAM Caching
Consider enabling RAM caching if you’re switching between different models or VAEs frequently.
You’ll find this in the ‘Stable Fusion’ tab in settings. It makes switching faster than loading from the disk, especially helpful for larger models.
8. Use Symbolic Links to Save Disk Space
You can use symbolic links to point to files like models and VAEs from different locations, so you don’t have to store multiple copies.
Use the Command Prompt and some simple commands to set up symbolic links, saving disk space.
9. Photoshop Objects into Images
If you want to add an object into your image, use an image editor to prepare two versions of your image: one with the object and one without.
Import both versions into AUTOMATIC1111, and you can blend the object seamlessly into your original image.
And that’s it; here’s everything you need to know about Stable Diffusion WebUI or AUTOMATIC1111.
The End
If you want to know more about AUTOMATIC1111 you can comment down below, or check out this video to watch a complete tutorial.
Also, don’t forget to read more related resources on Stable Diffusion and more:


A1111 is now superseded by( or complimented by ) the following ( https://github.com/lllyasviel/stable-diffusion-webui-forge ), for the most part the above usage instructions are identical, however the above referenced repository( forge ) generates images much more quickly in comparison to A1111
Thanks for sharing this!!