


For those who haven’t been blessed with innate artistic abilities, fear not!
Img2Img and Stable Diffusion can help elevate your drawings while preserving the original color and composition.
This powerful AI-driven tool can transform the simplest sketches into visually stunning masterpieces.
In this comprehensive guide, we’ll walk you through setting up the software, using the color sketch tool, and leveraging Img2Img to turn amateur sketches into professional artwork.
What is Img2Img in Stable Diffusion
Img2Img is a cutting-edge technique that generates new images from an input image and a corresponding text prompt.
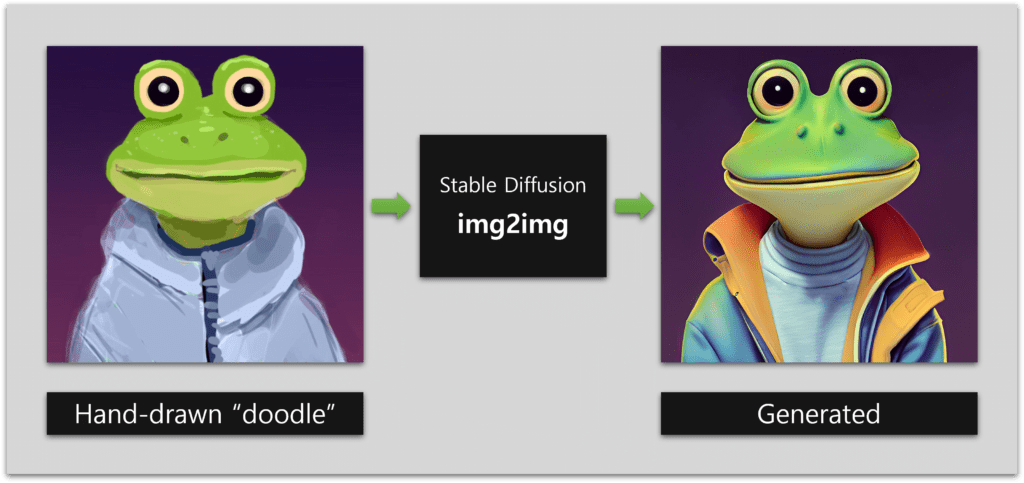
The output image retains the original color and composition of the input image.
It’s important to note that the input image does not need to be intricate or visually appealing.
The main focus should be on the color and composition, as these elements will be carried over to the final output.
Setting up The Software for Stable Diffusion Img2img
For this tutorial, we will use the AUTOMATIC1111 GUI, which offers an intuitive interface for the Img2Img process.
Now it’s time to enable the color sketch tool so that we can either draw or add images for reference.
By default, the color sketch tool is not enabled in the AUTOMATIC1111 GUI. However, activating it significantly simplifies the Img2Img process.
Here’s how to enable the color sketch tool:
Add the following argument when running webui.py:
--gradio-img2img-tool color-sketch
On Windows systems, edit the webui-user.bat file in the stable-diffusion-webui folder.
Modify the line:
"set COMMANDLINE_ARGS="
to
"set COMMANDLINE_ARGS=--gradio-img2img-tool color-sketch".
Make sure there’s a space before adding the new text. Double-click the file to launch the GUI.
This option is already enabled by default in the Colab Notebook Quick Start Guide.
After setting up the color sketch tool, it’s time to learn how to use it. To use the color sketch tool, follow these steps:
Go to the Img2Img tab in the AUTOMATIC1111 GUI and upload an image to the canvas.
Click the color palette icon, followed by the solid color button, then, the color sketch tool should now be visible.
Now you can draw in color, adding vibrancy and depth to your sketches.
How to Use img2img in Stable Diffusion
Now that we have set up the software and are familiar with the color sketch tool, let’s walk through the process of turning a simple sketch into a professional piece of artwork.
Step 1: Set the background
First, upload a black or white 512×512-pixel background to the canvas. This will serve as the foundation for your drawing.
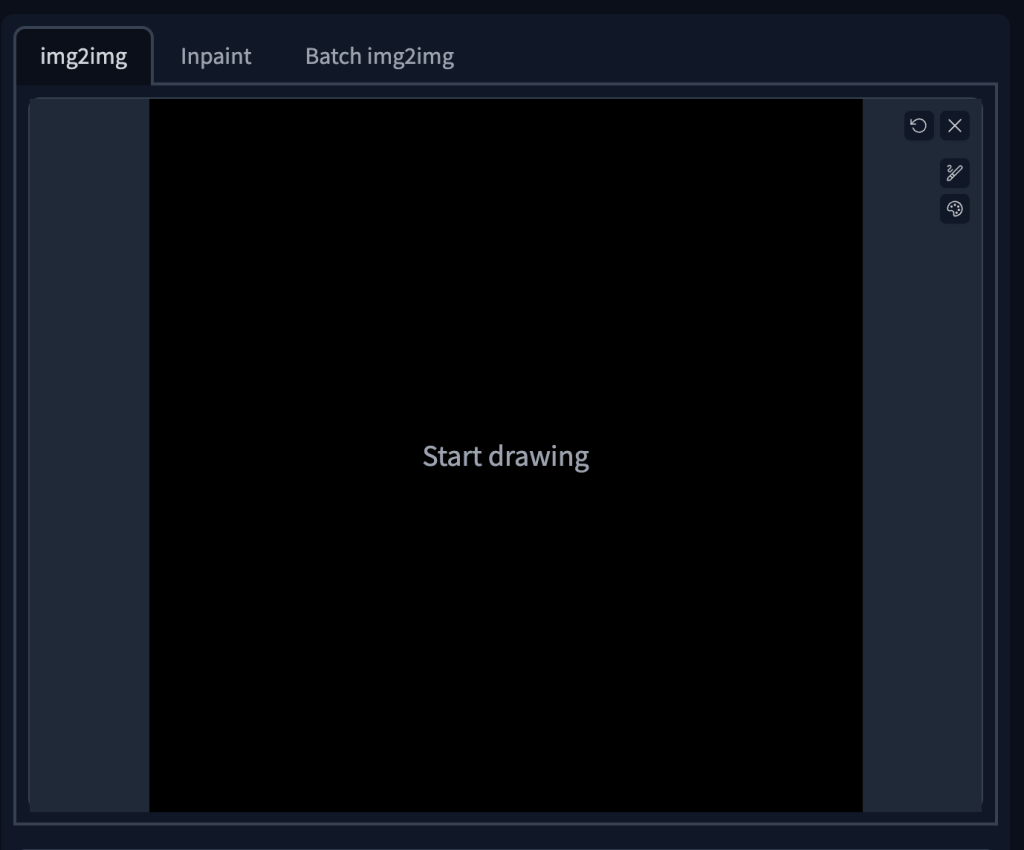
Step 2: Draw the Image
Using the color palette tool, sketch the doodle. Focus on capturing the color, shape, and overall composition, rather than perfecting the details.
Step 3: Apply Img2Img
With your sketch in place, it’s time to apply the Img2Img technique. Follow these steps:
Select the v1-5-pruned-emaonly.ckpt from the Stable Diffusion checkpoint dropdown.
Create a descriptive prompt for your image, for example “photo of a realistic banana with water droplets, and dramatic lighting.”
Enter this prompt in the text box.
Set the image width and height to 512, sampling steps to 20, sampling method to DPM++ 2M Karras, batch size to 4, and seed to -1 (random).

Experiment with the CFG scale and denoising strength to achieve the desired level of transformation.
Click Generate to produce four new images based on your input sketch and prompt. Examine the generated images and save the one you like best.
Note
You can opt for a second round of Img2Img for further refinement and enhanced detail. Also, watch the tutorial below to get a better understanding of how img2img works in Stable Diffusion⬇
The End!
Img2Img, powered by Stable Diffusion, gives users a flexible and effective way to change an image’s composition and colors. This provides users more control than the traditional text-to-image method.
By following this detailed guide, even if you’ve never drawn before, you can quickly turn your rough sketches into professional-quality art.


Great article. Love img2img!